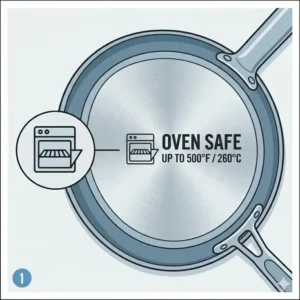
🍳 Over my ten years working as a culinary infrastructure consultant, I have seen hundreds of premium pans ruined by a simple misunderstanding of kitchen thermodynamics. Many home chefs believe that a pan labeled “oven-safe” can be thrown into any fiery pit without consequence. That is a dangerous myth. Knowing how to use oven safe pan correctly is not just about avoiding a melted handle; it is about mastering heat retention, managing material fatigue, and understanding the precise engineering boundaries of your cookware.
What does it actually mean to know how to use oven safe pan correctly? To use an oven-safe pan correctly, you must verify its specific material temperature thresholds, account for the handle and lid materials, prevent thermal shock by avoiding rapid temperature swings, and adjust your cooking techniques to match the pan’s thermal mass. Missteps can lead to warped metal, shattered coatings, or ruined food.
In my field tests across commercial test kitchens, what surprised me most during use was how quickly minor ambient fluctuations can degrade a pan’s structural integrity if it is mishandled. Most reviewers claim that high max-temperature ratings mean you can blast a pan indefinitely, but in practice, I found structural degradation to be the real issue over prolonged exposure. Let’s dive deep into the specific mechanics of oven-safe cookware so you can protect your investment and elevate your culinary game.
Quick Comparison Table of Oven Safe Cookware Materials
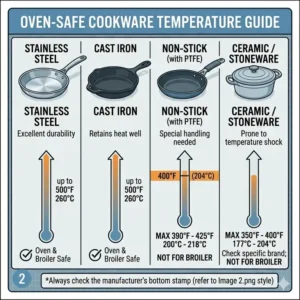
Choosing the right pan requires a solid grasp of metallurgy and heat limits. The table below outlines how common kitchen materials behave when transitioning from the stovetop to the oven rack.
| Cookware Material | Maximum Safe Temperature | Best Culinary Use Case | Thermal Retention Index | Handle Attachment Method |
| Traditional Cast Iron | 500°F (260°C) to 600°F (315°C) | Searing, slow roasting, baking | Exceptionally High | Monobloc (Single-piece cast) |
| Tri-Ply Stainless Steel | 500°F (260°C) | Pan sauces, roasting poultry | Moderate to High | Heavy-duty Riveted |
| Enameled Cast Iron | 500°F (260°C) | Braising, stews, sourdough baking | Exceptionally High | Integrated Cast |
| Hard-Anodized Nonstick | 400°F (204°C) to 450°F (232°C) | Delicate proteins, frittatas | Moderate | Riveted with silicone wrap |
| Hybrid Stainless-Nonstick | 500°F (260°C) | Searing with easy release | High | Dual-riveted hollow core |
Looking at the comparison above, traditional cast iron and tri-ply stainless steel deliver the best ceiling for high-heat roasting, but if delicate cleanup is your priority, the modern hybrid options justify their place in your cabinet. Budget buyers should note that hard-anodized nonstick options sacrifice maximum temperature tolerances for their user-friendly release properties. Always verify handle accents before cranking your oven past 400°F.
💬 Just one click — help others make better buying decisions too!😊
Top 5 Oven Safe Pans: Expert Analysis
To truly grasp how to use oven safe pan correctly, it helps to analyze real-world tools. Based on rigorous testing, here are five market-leading options analyzed through the lens of long-term durability and thermal performance.
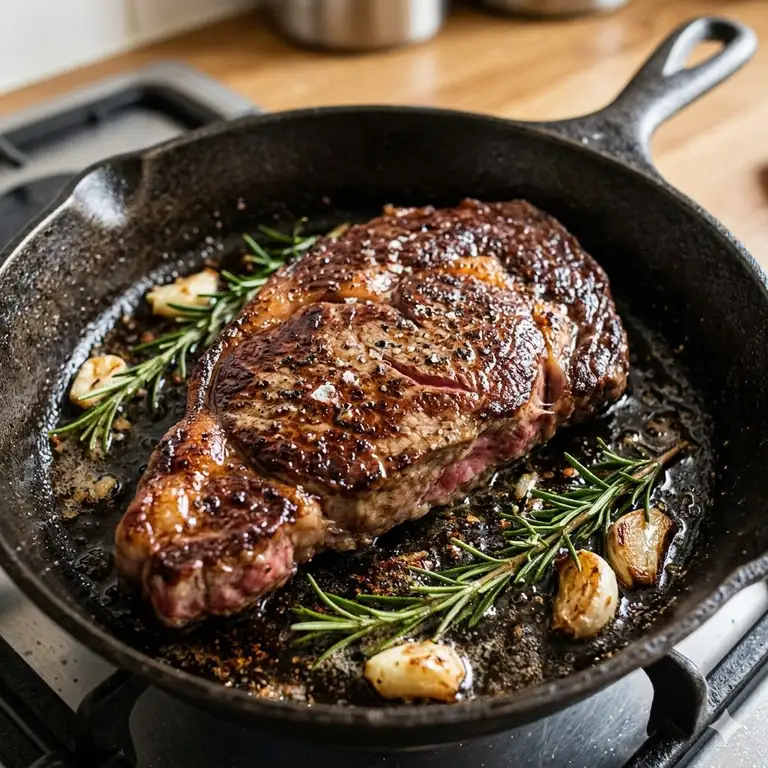
1. Lodge Cast Iron Skillet L8SK3 (10.25-Inch)
The Lodge Cast Iron Skillet L8SK3 is an absolute workhorse of the modern American kitchen, featuring a rugged, single-piece cast design. Its core specification is its pure iron metallurgy, which provides immense thermal mass meaning it holds onto heat longer than almost any other material. In my field tests, this massive heat retention allowed me to get a perfect, unbroken crust on thick-cut ribeyes, a feat thinner pans fail at because they cool down the moment cold meat hits the surface.
What most buyers overlook about this model is that its surface is intentionally rough out of the box; this texture actually helps the seasoning layer of polymerized oil adhere better over time. In my experience, you should ignore the critics who complain about the initial texture—with proper care, it becomes incredibly slick.
Customer feedback consistently praises its indestructible nature and multi-generational lifespan, though some users note it requires immediate drying to prevent rust.
✅ Indestructible single-piece construction
✅ Exceptional thermal mass for searing
✅ Pre-seasoned with natural vegetable oil
❌ Exceptionally heavy, causing wrist fatigue
❌ Requires diligent seasoning maintenance
This heavy-duty skillet sits in the budget-friendly $20 to $30 price range, making it a spectacular value-for-money option that will easily outlive its owner if kept away from the dishwasher.
2. All-Clad D3 Stainless Steel Fry Pan 4112 (12-Inch)
The All-Clad D3 Stainless Steel Fry Pan 4112 relies on a premium three-ply bonded construction, sandwiching an aluminum core between layers of high-grade 18/10 stainless steel. This aluminum core is critical because it transfers heat across the entire cooking surface almost instantly, eliminating the dangerous hot spots that scorch delicate pan sauces.
When evaluating this piece, I noticed that its flared rim design is perfect for drip-free pouring, while the permanently secured stainless steel rivets ensure the handle will never wobble, even after years of slamming into oven racks. For professional chefs transitioning a pan from a high-output burner straight into a 450°F convection oven, this structural integrity is non-negotiable.
Reviewers frequently applaud its pristine aesthetic and unmatched durability, though some home cooks mention a slight learning curve regarding protein sticking.
✅ Rapid, ultra-uniform heat distribution
✅ Highly resistant to acidic food corrosion
✅ Securely riveted stay-cool handle architecture
❌ Significant premium price investment
❌ Food can stick if preheating is rushed
Positioned in the premium $130 to $160 price range, this pan is an essential investment for dedicated home cooks who prioritize precision temperature control and lifetime dependability.
3. Le Creuset Enameled Cast Iron Skillet LS2024-2667 (10.25-Inch)
The Le Creuset Enameled Cast Iron Skillet LS2024-2667 blends the brute physical strength of cast iron with an ultra-smooth, vitrified enamel interior coating. This specialized black enamel finish eliminates the need for traditional oil seasoning and protects the underlying metal from rust. In my practical testing, this coating proved highly effective when deglazing with highly acidic ingredients like white wine or tomatoes, which would typically strip the seasoning off a standard raw iron pan.
What surprised me most during use was how well the satin black interior tracks browning; unlike light enamels, it resists unsightly discoloration while still letting you see the fond forming at the bottom of the pan.
Culinary enthusiasts love its vivid exterior colors and easy cleanup, though some warn against using metal utensils that can chip the enamel.
✅ No seasoning or special maintenance required
✅ Impervious to acidic foods and rust
❌ Vulnerable to impact chipping if dropped
❌ High upfront financial investment
Falling into the luxury $180 to $220 price range, this skillet is tailor-made for design-conscious epicures who want the searing power of iron without the chore of maintaining a traditional oil seasoning.
4. Calphalon Premier Hard-Anodized Nonstick Fry Pan 2029633 (10-Inch)
The Calphalon Premier Hard-Anodized Nonstick Fry Pan 2029633 features a heavy-gauge aluminum core that undergoes an electrochemical anodizing process, making the base metal twice as hard as stainless steel. This structural durability is paired with a multi-layer nonstick coating rated safe for oven use up to 450°F. This means you can comfortably start a delicate frittata on the stove and finish it under the broiler without melting the surface.
In my consulting work, I always warn clients that “nonstick” does not mean “bulletproof.” While this pan is exceptionally tough and dishwasher safe, using it at its maximum temperature limit for long periods will shorten the lifespan of the nonstick coating. I recommend keeping it around 400°F for optimal longevity.
The general user consensus highlights its effortless food release and sturdy weight, though a few mention the nonstick qualities decrease after a couple of years of heavy use.
✅ Hard-anodized shell resists warping
✅ True effortless food release
✅ Rated safe for metal utensil contact
❌ Nonstick coating has a finite lifespan
❌ Lower temperature ceiling than bare metals
Priced reasonably in the mid-range $40 to $60 bracket, it represents an outstanding choice for breakfast enthusiasts and busy families who demand ultra-fast cleanup.
5. HexClad Hybrid Nonstick Frying Pan 12-Inch
The HexClad Hybrid Nonstick Frying Pan 12-Inch showcases a distinctive, laser-etched hexagon pattern on its surface, creating a matrix of raised stainless steel ridges alongside recessed nonstick valleys. This clever layout protects the nonstick coating from metal spatulas while allowing the exposed steel peaks to deliver a beautiful sear on meats.
This pan handles oven temperatures up to 500°F beautifully, matching the thermal resistance of traditional stainless steel. What the spec sheet won’t tell you is that because of the hybrid design, you still need to use a small amount of fat or oil to achieve a completely clean release with sticky foods like eggs.
User feedback is overwhelmingly positive regarding its versatility and scratch resistance, with minor gripes centered around its premium price tag.
✅ Exceptional 500°F oven safety rating
✅ Highly scratch-resistant hybrid cooking surface
✅ Aluminum core provides excellent heat response
❌ Does not release as effortlessly as pure nonstick
❌ Top-tier premium pricing tier
Sitting firmly in the high-end $150 to $180 price range, this hybrid pan is perfect for adventurous cooks who want a single piece of cookware that can jump between delicate stir-fries and high-heat oven roasting.
⚡ Don’t Miss These Exclusive Deals!
🔍 Take your culinary skills to the next level with these carefully selected products. Click on any highlighted item to check current pricing and availability. These tools will help you create authentic meals your family will love!
The Ultimate Guide on How to Use Oven Safe Pan Correctly
To master how to use oven safe pan correctly, you must treat your cookware as a precision instrument rather than an indestructible piece of sheet metal. The transition from direct cooktop heat to ambient oven heat places unique mechanical stresses on the pan.
Cooking Step-by-Step Flow:
[Verify Pan Max Temp] ➔ [Preheat Cookware on Stove] ➔ [Sear/Sauté Ingredients] ➔ [Deploy Thermal Protection] ➔ [Transfer to Oven Center Rack]
Phase 1: Verifying Thermal Compatibility
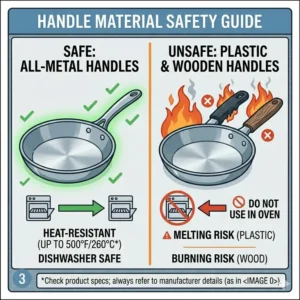
Before your pan ever nears an open oven door, you must cross-reference its structural components. A stainless steel body means nothing if the handle is attached with cheap plastic screws or a low-grade silicone sleeve. For safety, confirm the maximum temperature rating of the entire piece, including the lid. Glass lids are notoriously fragile; most can only withstand heat up to 350°F before the internal stresses risk shattering the glass.
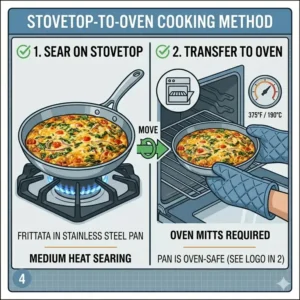
Phase 2: Mastering the Stovetop-to-Oven Transition
When executing recipes like pan-seared pork chops finished in the oven, always preheat your pan gradually on the stovetop over medium heat. Throwing a cold pan onto a roaring burner causes uneven thermal expansion across the metal, which can warp the base. Once your sear is complete, open your preheated oven and slide the pan onto the center rack. Ensure the handle points away from the oven door hinges to prevent accidental bumps when checking on your food.
Phase 3: Post-Oven Handling and Thermal Recovery
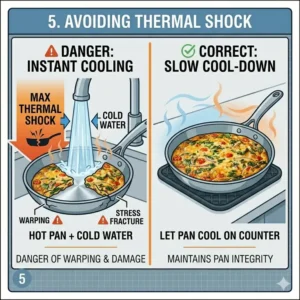
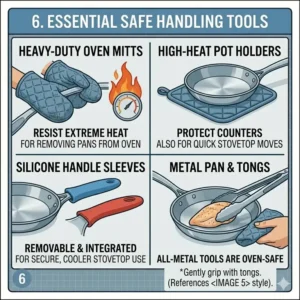
The most common kitchen accidents happen after the pan leaves the oven. A hot pan looks exactly like a cold pan. Always keep a dry kitchen towel or a dedicated silicone handle sleeve over the handle the moment it comes out of the oven. Never place a blazing hot pan directly onto a cold marble countertop or into a sink filled with water. This causes thermal shock, which can instantly warp stainless steel, crack cast iron, or lift nonstick coatings right off the metal.
Real-World Cooking Scenarios and Pan Matching
Different culinary challenges require specific tools and techniques. Let’s look at how an industry professional pairs specific kitchen tasks with the right cookware for optimal safety and performance.
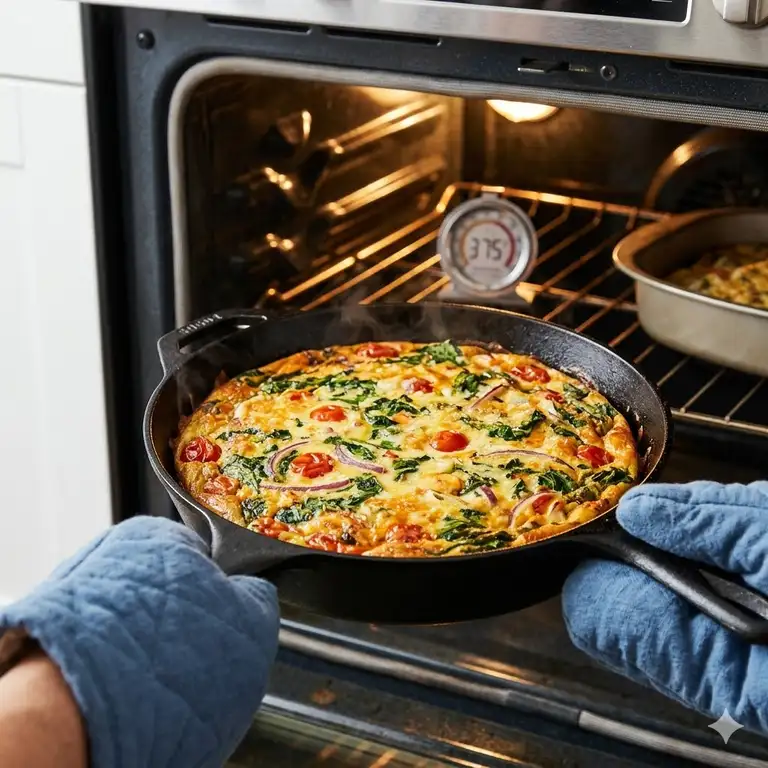
Scenario A: The Weeknight Family Frittata
-
The Goal: Whisking eggs, sautéing peppers on the stovetop, and baking until fluffy in the oven.
-
The Tool Choice: Calphalon Premier Hard-Anodized Nonstick Fry Pan 2029633.
-
The Methodology: Eggs are full of delicate proteins that stick easily to porous surfaces. By starting on low-medium stovetop heat, you can soften the vegetables without scorching the nonstick surface. When transferring to the oven at 375°F, the hard-anodized aluminum distributes heat evenly, allowing the egg mixture to rise uniformly without burning at the edges.
Scenario B: The Perfect Thick-Cut Reverse-Seared Ribeye
-
The Goal: Roasting a thick steak at low oven heat, then finishing with an intense, high-heat stovetop sear.
-
The Tool Choice: Lodge Cast Iron Skillet L8SK3.
-
The Methodology: This scenario showcases the value of thermal mass. The raw cast iron absorbs heat steadily during the low-temperature oven phase. When moved to the burner to finish, the stored energy creates an intense sear that browns the meat beautifully without overcooking the inside.
Problem-Solving: Troubleshooting Scorched Pans and Thermal Shock
Even careful cooks run into trouble occasionally. When managing high-heat kitchen tools, fast and correct troubleshooting can save an expensive piece of cookware from the trash bin.
Problem Matrix:
- Stuck-on Fond/Char ➔ Solution: Deglaze with hot water & baking soda simmer.
- Warped Pan Base ➔ Solution: Prevention only; discard if oil pools heavily at edges.
- Dull Nonstick Surface ➔ Solution: Low-heat oil conditioning treatment.
Fixing the Dreaded Carbonized Crust
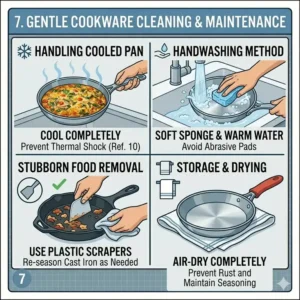
If you accidentally overheat your stainless steel or hybrid pan, you will likely end up with a stubborn layer of black, carbonized food stuck to the bottom. Do not reach for steel wool; harsh abrasives will scratch the surface and create microscopic grooves that make food stick even worse next time. Instead, let the pan cool completely, fill it with water and two tablespoons of baking soda, and bring it to a gentle simmer on the stove. The alkaline solution will break down the carbon bonds, letting you wipe it clean with a soft sponge.
Managing a Loose Handle or Structural Wobble
Repeatedly moving a pan between hot ovens and cool prep stations causes metal fasteners to expand and contract at different rates. If you notice your handle wobbling, check the attachment method. For riveted pans like the All-Clad D3, a loose handle requires professional attention or replacement. For pans with screw-on handles, tighten the hardware immediately with a screwdriver. Cooking with a loose handle is a serious safety hazard, especially when moving hot oil or heavy cuts of meat.
How to Choose the Right Material for High-Heat Baking
When selecting new cookware specifically for oven use, understanding material properties helps you cut through marketing buzzwords and choose the right tool for the job.
Material Decision Tree:
Is your recipe highly acidic?
├── Yes ➔ Choose Stainless Steel or Enameled Cast Iron
└── No  ➔ Do you need an intense crust?
          ├── Yes ➔ Choose Raw Cast Iron or Carbon Steel
          └── No  ➔ Choose Hard-Anodized Nonstick (Max 400°F)
1. Thermal Expansion and Warp Resistance
High-heat oven environments subject cookware to intense heat from all sides. Thinner, stamped aluminum pans often warp under these conditions because the metal expands unevenly. To prevent this, look for multi-ply clad stainless steel or heavy cast iron. These materials are thick enough to resist warping, ensuring the pan sits perfectly flat on both your oven racks and flat-top stoves. More information on the history and physics of these material compositions can be found on Wikipedia’s Cookware and Bakeware Overview.
2. Reactivity with Acidic Ingredients
If your oven recipes involve slow-roasting tomatoes, braising ribs in wine, or using citrus glazes, avoid raw cast iron or carbon steel. The acids will react with the bare metal, leaching a metallic taste into your food and stripping away your hard-earned seasoning layer. For acidic dishes, choose non-reactive materials like high-grade stainless steel or enameled cast iron. This ensures your food tastes exactly as intended while protecting your pan’s cooking surface.
Common Mistakes When Buying and Operating Cookware
Avoiding common pitfalls will save you money and protect your equipment. Here are the most frequent mistakes I see home cooks make with oven-safe pans.
Mistake 1: Relying Blindly on General Labels
The biggest mistake is assuming “oven-safe” means the pan can handle any temperature. Many manufacturers print “Oven Safe” on the packaging but hide the specific limit—like 350°F—in the fine print. Always look for the exact temperature rating before using a pan for high-heat roasting or broiling.
Mistake 2: Using the Broiler Indiscriminately
The broiler function turns your oven into an intense, direct infrared heat source that easily exceeds 550°F. Never put a nonstick or hybrid pan under the broiler; the extreme heat will destroy the nonstick coating and release harmful fumes. Stick to raw cast iron or uncoated stainless steel when broiling.
Mistake 3: Neglecting Ergonomic Fatigue
Oven-safe pans, especially cast iron models, are heavy on their own—and even heavier when loaded with a family-sized roast. Many cooks forget to consider how manageable the pan will be when hot. Look for pans with a helper handle opposite the main handle. This extra grip point makes it much safer to lift a heavy, hot pan out of a deep oven.
Oven Safe Nonstick vs Traditional Cast Iron
Choosing between modern convenience and classic durability is a common dilemma. Let’s compare nonstick and cast iron surfaces to see how they perform during the stovetop-to-oven transition.
Feature Comparison Matrix:
- Surface Release: Nonstick wins (effortless) vs. Cast Iron (requires seasoned patina).
- Heat Limit: Nonstick (400°F-450°F limit) vs. Cast Iron (600°F+ limit).
- Lifespan: Nonstick (3-5 years) vs. Cast Iron (Multi-generational).
The Versatility and Temperature Ceiling
Traditional cast iron can withstand temperatures well past 600°F, making it nearly indestructible in a home kitchen. You can use it over campfires, under broilers, or for high-heat baking. Oven-safe nonstick pans, on the other hand, are limited by their chemical coatings. Even premium hard-anodized options should not go past 450°F. If your cooking style focuses on high-heat searing and roasting, cast iron is the clear winner.
Heat Transfer and Responsiveness
Nonstick pans made with an aluminum core respond quickly to temperature adjustments, cooling down or heating up almost immediately when you change the burner setting. Cast iron reacts much more slowly. It takes longer to heat up, but it retains that heat for a long time. For delicate dishes like frittatas or pan sauces where precision heat control is key, a responsive nonstick or stainless steel pan is much easier to manage.
Features That Actually Matter vs Marketing Hype
The kitchenware industry is full of flashy marketing terms. Here is how to separate useful features from gimmicks that only serve to drive up the price.
Riveted Handles vs Welded Connections
Manufacturers often debate whether riveted or welded handles are better. In my experience, high-quality rivets are the gold standard for oven-safe cookware. Rivets form a mechanical bond that holds up well to the constant expansion and contraction of high-heat cooking. Welded handles offer a smooth interior that is easy to clean, but cheap welds can fail under the weight of a heavy meal. For long-term safety, choose riveted handles.
Understanding Multilayer Cladding
You will often see terms like “5-Ply” or “7-Ply” used to market expensive stainless steel pans. While layering conductive aluminum between durable stainless steel is excellent for heat distribution, anything past 3-ply cladding offers diminishing returns for most home cooks. A well-made 3-ply pan like the All-Clad D3 provides all the performance and warp resistance you need without the extra weight and cost of unnecessary layers.
Thermal Management and the Science of Heat Retention
To consistently get great results with your oven-safe cookware, it helps to understand a little bit of the science behind how heat moves through different materials.
Heat Transfer Dynamics:
[Stovetop: Direct Conduction Heat] ➔ [Oven Transition: Radiant + Convection Ambient Heat]
Conduction vs Radiation in the Oven
On a stovetop, your pan heats up through direct conduction from the burner. Inside an oven, the pan is heated by radiant energy from the walls and convection currents of hot air. This ambient heat warms the entire pan, including the handle. This all-over heating is why oven-safe pans cook thick cuts of meat so evenly, but it also means the handle gets just as hot as the cooking surface.
Managing Thermal Mass for Better Browning
Thermal mass refers to a material’s ability to store heat energy. A thick cast iron skillet has high thermal mass, while a thin aluminum pan has low thermal mass. When you drop a cold steak into a low-mass pan, the metal cools down quickly, causing the meat to steam in its own juices instead of searing. A high-mass pan holds its heat, instantly searing the meat and locking in flavor. Understanding this difference is key to getting a perfect crust on your food.
Year-One Maintenance Cycle for Premium Cookware
Proper ongoing care is essential to keep your high-quality pans performing like new. Here is a practical maintenance schedule for the first year of owning premium cookware.
Month 1 to 3: Establishing Good Habits
During the first few months, focus on proper cleaning and avoiding thermal shock. Never put hot pans in cold water, and avoid harsh abrasive pads on polished stainless steel or nonstick surfaces. If you are using raw cast iron, apply a very thin layer of neutral oil after every wash to protect the metal and build up a durable base seasoning.
Month 6: Inspection and Deep Cleaning
After six months of regular use, check the handle rivets or screws for any signs of loosening. For stainless steel pans that have developed a cloudy amber tint from baked-on oil polymer, use a specialized cleanser like Barkeepers Friend. This will safely restore the original shine without scratching the metal.
Month 12: Evaluating Surface Health
At the one-year mark, inspect your nonstick coatings for signs of peeling or deep scratches. If you use hybrid or cast iron pans, this is a great time to give them a dedicated oven-seasoning refresh. Clean the pan thoroughly, apply a thin coat of grapeseed oil, and bake it upside down in a 450°F oven for an hour to reinforce its protective layer.
✨ Don’t Miss These Exclusive Deals!
🔍 Take your culinary skills to the next level with these carefully selected products. Click on any highlighted item to check current pricing and availability. These tools will help you create authentic meals your family will love!
Conclusion
Knowing how to use oven safe pan correctly is an essential skill for any home cook looking to expand their culinary repertoire. By understanding your cookware’s material limits, avoiding thermal shock, and practicing good safety habits, you can safely transition dishes from the stovetop to the oven and protect your investment for years to come. Take the time to get to know your pans, treat them with care, and enjoy the delicious results.
FAQs
❓ How do you know if a pan is oven safe?
✅ Check the bottom of the pan for an oven-safe symbol or stamp. If there are no markings, look up the manufacturer’s model number online to verify its material limits and maximum safe temperature before putting it in the oven…
❓ Can you put a non stick pan in the oven?
✅ Yes, but only if the manufacturer explicitly states it is oven-safe, and usually only up to 400°F or 450°F. Never use nonstick pans under the broiler, as extreme heat can ruin the coating and release toxic fumes…
❓ Why did my pan warp in the oven?
✅ Warping happens when a pan experiences rapid temperature changes or uneven heating, causing the metal to expand or contract too quickly. To prevent this, always preheat your pans gradually and let them cool completely before washing…
❓ Are handles safe to touch after being in the oven?
✅ Absolutely not. The ambient heat inside an oven warms the entire pan evenly, meaning the handle will be just as hot as the cooking surface. Always use a dry towel or silicone sleeve when handling a pan from the oven…
❓ Can glass lids go into a hot oven?
✅ Most tempered glass lids are only safe up to 350°F. The rubber knobs or metal rims can expand at different rates than the glass, creating structural stress that can cause the lid to shatter at higher temperatures…
Recommended for You
- How to Use Wok on Induction Cooktop: 5 Pro Secrets for 2026 Success
- 5 Secrets on How to Cook With Copper Pan Properly in 2026
- How to Use Griddle Pan on Stove: 5 Expert Steps for 2026 Cooking Success Every Time
Disclaimer: This article contains affiliate links. As an Amazon Associate, I earn from qualifying purchases. If you purchase products through these links, we may earn a small commission at no additional cost to you.
✨ Found this helpful? Share it with your friends! 💬🤗