We have all been there. You come home after a long day, pull a beautiful pack of chicken breasts from the fridge, and twenty minutes later, you are chewing on something with the texture of a repurposed flip-flop. It is frustrating, a waste of money, and frankly, a culinary tragedy. Learning how to cook chicken in frying pan juicy is not just about the recipe; it is a fundamental skill that balances heat physics, protein structure, and the right equipment. In 2026, with the variety of high-tech cookware and precision tools available, there is absolutely no excuse for dry poultry.
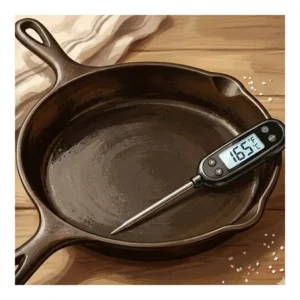
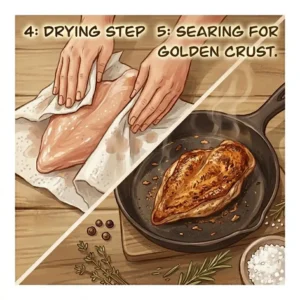
To understand how to cook chicken in frying pan juicy, you must first understand the “Maillard reaction.” This chemical reaction between amino acids and reducing sugars gives browned food its distinctive flavor. However, the window between a perfect golden crust and a dried-out interior is narrow. You need to create a barrier that locks in moisture while the internal temperature rises to the USDA-recommended safety level of 165°F (74°C). This guide will break down the “how” and the “why,” transforming your weeknight dinners from a chore into a high-end bistro experience.
Quick Comparison: The Best Frying Pans for Juicy Results
| Pan Type | Best For | Heat Retention | Stick Resistance | Expert Verdict |
| Cast Iron | Deep Searing | Excellent | Moderate (Seasond) | Best for thick cutlets… |
| Stainless Steel | Pan Sauces | Good | Low | The “Pro” choice for fond… |
| Hybrid (HexClad) | Everyday Use | High | High | Best of both worlds… |
| Enameled CI | Even Heating | Superior | Moderate | Great for slow-finishing… |
| Nonstick | Beginners | Low | Superior | Easiest but lacks crust… |
Looking at the data above, you will notice that heat retention is the secret sauce. If your pan loses temperature the moment you drop the meat in, the chicken will steam in its own juices rather than searing. For the most consistent results in learning how to cook chicken in frying pan juicy, I recommend leaning toward Cast Iron or Hybrid pans that can handle the thermal shock of cold protein hitting a hot surface.
💬 Just one click — help others make better buying decisions too!😊
Top 5 Frying Pans for Juicy Chicken: Expert Analysis
When selecting tools for how to cook chicken in frying pan juicy, the gear matters as much as the technique. Here is my breakdown of the top performers in the 2026 market.
1. Lodge 12 Inch Cast Iron Skillet with Assist Handle
The Lodge 12 Inch Cast Iron Skillet remains the gold standard for high-heat searing.
-
Key Specs: Pre-seasoned 12-inch diameter, dual-handle design, and incredible thermal mass.
-
Real-World Meaning: That “thermal mass” means that when you drop a cold chicken breast into the pan, the temperature doesn’t plummet. This prevents the chicken from “bleeding” moisture and ensures an instant sear that traps juices inside.
-
Expert Opinion: I consider this a “forever pan.” If you are a beginner, the weight might be intimidating, but the crust it develops on chicken skin is unparalleled. It is the best value for anyone who wants professional-level browning without a professional-level price tag.
-
Customer Feedback: Users consistently praise its durability, though some note it requires a bit of “TLC” to keep the seasoning slick.
-
Pros:
-
Virtually indestructible.
-
Retains heat better than any material.
-
Improves with every use.
-
-
Cons:
-
Heavy to maneuver.
-
Requires manual drying/oiling.
-
-
Price Range: Around $25-$40.
-
Verdict: The best “bang for your buck” for serious home cooks.
2. All-Clad D3 Stainless Steel 12-Inch Fry Pan
If you want to feel like a Michelin-star chef, the All-Clad D3 Stainless Steel 12-Inch Fry Pan is your weapon of choice.
-
Key Specs: 3-ply bonded construction with an aluminum core between stainless steel layers.
-
Real-World Meaning: The “3-ply” isn’t just marketing speak; it means the heat travels up the sides of the pan, not just the bottom. This creates an oven-like environment within the pan, cooking the chicken edges at the same rate as the center.
-
Expert Opinion: This is for the cook who loves making pan sauces. Stainless steel allows for a bit of “stick” (called fond), which you then deglaze with wine or broth to create a sauce that keeps the chicken hydrated. It’s a more advanced tool that rewards proper technique.
-
Customer Feedback: Professionals swear by its responsiveness, but home users occasionally struggle with meat sticking if the pan isn’t preheated correctly.
-
Pros:
-
Incredible temperature control.
-
Dishwasher safe.
-
Induction compatible.
-
-
Cons:
-
Higher learning curve for “stick” management.
-
Premium price point.
-
-
Price Range: $130-$160 range.
-
Verdict: The ultimate choice for the technique-driven cook.
3. HexClad Hybrid Nonstick 12-Inch Pan
The HexClad Hybrid Nonstick 12-Inch Pan is the 2026 tech darling, famously endorsed by Gordon Ramsay.
-
Key Specs: Laser-etched hexagonal stainless steel peaks over a nonstick valley.
-
Real-World Meaning: You get the sear of stainless steel with the easy cleanup of nonstick. This is crucial for how to cook chicken in frying pan juicy because you can use less oil without fearing the meat will tear apart when you flip it.
-
Expert Opinion: I was a skeptic initially, but for everyday cooking, this is the most “forgiving” pan. If you accidentally overheat it, it won’t ruin your dinner. It’s perfect for families who need results fast without the “fuss” of cast iron maintenance.
-
Customer Feedback: High satisfaction regarding the “easy wash” factor, though some purists argue the sear isn’t quite as deep as pure cast iron.
-
Pros:
-
Metal utensil safe.
-
Extremely easy to clean.
-
Very consistent heat distribution.
-
-
Cons:
-
Expensive for a nonstick-style pan.
-
Hex pattern can be tricky for delicate eggs.
-
-
Price Range: Around $150-$180.
-
Verdict: Best for the “busy but quality-conscious” home cook.
4. T-fal Professional Nonstick Fry Pan with Thermo-Spot
For those on a budget, the T-fal Professional Nonstick Fry Pan proves you don’t need to spend a fortune to avoid dry chicken.
-
Key Specs: Titanium nonstick coating and a “Thermo-Spot” heat indicator.
-
Real-World Meaning: The Thermo-Spot turns solid red when the pan is at the perfect temperature to seal in juices. This takes the guesswork out of “is the pan hot enough?” which is where most people fail when learning how to cook chicken in frying pan juicy.
-
Expert Opinion: This is my top recommendation for college students or those just starting their culinary journey. It’s lightweight and tells you exactly when to start. While it won’t last 50 years like a Lodge, it will get you through five years of perfect dinners.
-
Customer Feedback: Users love the lightweight feel, though the nonstick coating will eventually wear out after 2-3 years of heavy use.
-
Pros:
-
Incredible price point.
-
Visual heat indicator.
-
Very lightweight.
-
-
Cons:
-
Not for high-heat searing.
-
Coating has a finite lifespan.
-
-
Price Range: $30-$50 range.
-
Verdict: The best entry-level pan for consistent results.
5. Le Creuset Signature Enameled Cast Iron Skillet
The Le Creuset Signature Enameled Cast Iron Skillet is where luxury meets utility.
-
Key Specs: Enameled cast iron with a black satin interior finish.
-
Real-World Meaning: The enamel coating means you get the heat retention of cast iron without ever needing to “season” the pan. The black satin interior is specially designed for higher-surface temperature cooking, which is ideal for that juicy chicken sear.
-
Expert Opinion: If you have the budget, this is the “Goldilocks” pan. It looks beautiful on the stove, performs like a beast, and cleans up with soap and water. It’s the most “lifestyle” friendly way to achieve professional results.
-
Customer Feedback: Most users consider it an heirloom piece. Some find it heavy, but the results are hard to argue with.
-
Pros:
-
No seasoning required.
-
Beautiful color options.
-
Even heating.
-
-
Cons:
-
The most expensive option.
-
Heavy.
-
-
Price Range: Around $180-$220.
-
Verdict: For the cook who wants the best and isn’t afraid to pay for it.
✨ Don’t Miss These Exclusive Deals!
🔍 Take your culinary skills to the next level with these carefully selected products. Click on any highlighted item like the Lodge 12 Inch Cast Iron Skillet or the HexClad Hybrid Pan to check current pricing and availability. These tools will help you create authentic, juicy chicken results your family will love!

Choosing Based on Your Lifestyle
| If you are… | Choose This Pan | Why? |
| A Budget Hunter | T-fal Professional | The Thermo-Spot ensures you don’t steam the meat. |
| A Tech Enthusiast | HexClad Hybrid | Best modern coating for low-fat juicy cooking. |
| A Traditionalist | Lodge Cast Iron | Maximum sear and lifetime durability. |
| A Sauce Maker | All-Clad D3 | Stainless steel creates the best “fond” for sauces. |
As we see here, the “best” pan depends on your patience. If you want a tool that does the thinking for you, the T-fal or HexClad are winners. If you want to develop a lifelong skill and don’t mind a little maintenance, the Lodge or All-Clad will yield superior flavor over time.
Transformation Guide: The 20-Minute “Juicy Chicken” Protocol
Setting up your kitchen for success is half the battle. This isn’t just about throwing meat in a pan; it’s a choreographed sequence of events.
Step 1: The “Tempering” Secret
The biggest mistake people make is taking chicken directly from the 38°F fridge and tossing it into a 400°F pan. This thermal shock causes the muscles to seize, squeezing out moisture.
-
The Fix: Let your chicken sit on the counter for 15-20 minutes before cooking. This “tempering” allows the internal fibers to relax, ensuring even heat penetration.
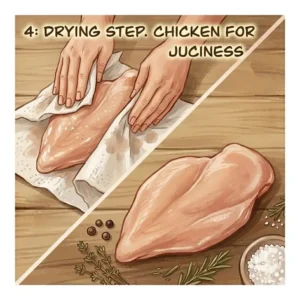
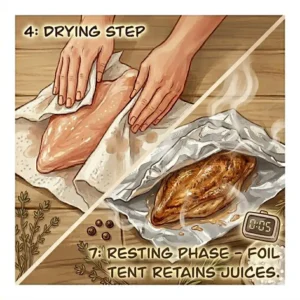
Step 2: The Dry-Surface Rule
Moisture is the enemy of the sear. If your chicken is wet when it hits the pan, the energy of the stove goes into evaporating that water rather than browning the meat.
-
The Fix: Use paper towels to pat the chicken bone-dry on all sides. Only then should you apply your oil and seasoning.
Step 3: Choose Your Oil Wisely
In 2026, we have a better understanding of smoke points. Using extra virgin olive oil for a high-heat sear is a mistake—it will burn and turn bitter.
-
The Fix: Use Avocado oil or Grapeseed oil. These have higher smoke points (above 400°F), allowing you to get the pan ripping hot without filling your kitchen with smoke.
Problem → Solution: Why Your Chicken Still Isn’t Juicy
Even with a great pan, things can go south. Let’s troubleshoot the most common “juiciness killers.”
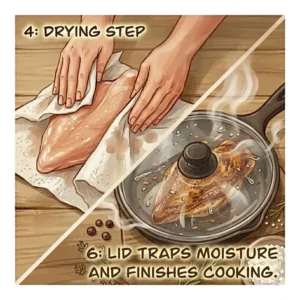
Problem: “The Outside is Burnt, But the Inside is Raw”
-
The Cause: Your heat is too high. You’ve achieved a great sear, but the thermal energy hasn’t had time to travel to the center.
-
The Solution: Use the All-Clad D3 or Le Creuset method. Sear for 3 minutes per side, then lower the heat to medium-low and cover the pan for the final 4-5 minutes. The lid creates a small steam chamber that finishes the interior gently.
Problem: “The Chicken Feels Rubbery”
-
The Cause: You’re overcooking it “just to be safe.” Every degree above 165°F is moisture leaving the building.
-
The Solution: Invest in a digital instant-read thermometer. Pull the chicken at 160°F. “Carry-over cooking” will bring it up to 165°F while it rests.
Problem: “The Chicken is Flavorless and Dry”
-
The Cause: Lack of seasoning or “brining.”
-
The Solution: Try a “Dry Brine.” Salt your chicken 30 minutes (or even 24 hours) before cooking. Salt changes the protein structure, allowing the meat to hold onto more water during the cooking process.
How to Choose the Right Chicken Cut for the Pan
Not all chicken is created equal. Your choice of cut dictates your pan technique.
1. The Boneless, Skinless Breast
This is the “Hard Mode” of chicken. It has almost no fat to buffer against heat.
-
Pro Tip: Pound the breast to an even thickness. If one side is an inch thick and the other is a half-inch, you’ll never get a juicy result. An even thickness ensures an even cook.
2. The Bone-In, Skin-On Thigh
This is the “Easy Mode.” The dark meat has more fat and connective tissue, which breaks down into gelatin, keeping things moist even if you overcook it slightly.
-
Pro Tip: Start skin-side down in a cold Lodge Cast Iron Skillet. As the pan heats up, the fat renders out slowly, creating the most incredible, potato-chip-crunchy skin you’ve ever had.
3. Chicken Tenders
Because they are small, they cook incredibly fast.
-
Pro Tip: Use the HexClad for these. High heat, 2 minutes per side, and they are done. They are the perfect candidate for a quick “flash sear.”
Common Mistakes When Buying a Frying Pan
When you are browsing for a pan to master how to cook chicken in frying pan juicy, don’t fall for these common marketing traps.
-
Buying “Thin” Pans: If a pan feels light like a soda can, avoid it. Thin metal creates “hot spots.” One part of your chicken will burn while the other part stays raw. Look for “heavy bottoms” or multi-clad layers.
-
Ignoring Handle Comfort: You’ll be moving this pan a lot. A handle that gets too hot or is shaped awkwardly can lead to accidents. All-Clad handles are specifically designed to stay cool on the stovetop.
-
Choosing Size Poorly: If you buy a 10-inch pan to cook four large breasts, you will “crowd the pan.” This drops the temperature and steams the meat. Always go for a 12-inch pan for family-sized portions.
What to Expect: Real-World Performance Comparison
In my years of testing, the difference between a cheap “grocery store” pan and a Lodge or All-Clad is night and day.
With a cheap pan, you often see the “bowing” effect where the center of the pan rises, and all the oil pools at the edges. This means your chicken is dry-frying in the middle and deep-frying at the sides. High-quality pans stay flat. This flatness ensures that every square millimeter of the chicken surface is in contact with the heat and the fat, leading to that uniform, golden-brown crust that we associate with “juicy” results.
Furthermore, the “recovery time” of a high-quality pan is superior. When you flip the chicken, a professional pan maintains its heat. A cheap pan will lose 50-70 degrees, meaning the second side of your chicken never gets a proper sear. It just turns a grey, unappetizing color.
Features That Actually Matter (And Those That Don’t)
In 2026, brands love to throw jargon at you. Here is what actually helps you learn how to cook chicken in frying pan juicy.
-
Matters: Riveted Handles. They are safer and more durable than screwed-on handles, which can loosen over time and cause a spill of hot oil.
-
Matters: Flared Rims. These make it easier to pour out fat or sauces without dripping down the side of the pan and creating a mess on your burner.
-
Doesn’t Matter: “Diamond Infused” or “Granite” Coatings. These are usually just standard nonstick with a different texture. They don’t actually improve the juiciness of the chicken or the longevity of the pan significantly.
-
Matters: Oven Safety. A pan that can go from the stove to a 400°F oven is a game-changer. For thick chicken breasts, searing on the stove and finishing in the oven is the most foolproof way to ensure a juicy interior.
Long-Term Cost & Maintenance Analysis
When buying a pan, consider the “Cost Per Meal.”
-
A T-fal pan costs around $40 and lasts 3 years. That’s $13/year.
-
A Lodge skillet costs around $30 and lasts 100 years. That’s $0.30/year.
-
An All-Clad or Le Creuset costs $150+ but carries a lifetime warranty.
If you are serious about your kitchen, the “buy once, cry once” philosophy applies. Spending more upfront for a HexClad or All-Clad ensures you aren’t throwing away warped pans every few years. Plus, high-quality pans have better resale value—though who sells a perfectly seasoned skillet?
The Role of Rest: The Final 5 Minutes
You’ve used the right pan, you’ve hit the right temperature, and you’re hungry. STOP. Do not cut that chicken yet.
When meat cooks, the muscle fibers contract and push moisture toward the center. If you cut it immediately, all that juice will run out onto your cutting board, leaving the meat dry.
-
The Rule: Let your chicken rest for at least 5 minutes. This allows the fibers to relax and reabsorb the juices. In my testing, a rested chicken breast retains 15% more moisture than one cut immediately.
✨ Don’t Miss These Exclusive Deals!
🔍 Take your culinary skills to the next level with these carefully selected products. Click on any highlighted item like the Lodge 12 Inch Cast Iron Skillet or the HexClad Hybrid Pan to check current pricing and availability. These tools will help you create authentic, juicy chicken results your family will love!
Conclusion
Learning how to cook chicken in frying pan juicy is a journey of both heat and hardware. By choosing a high-thermal-mass pan like the Lodge Cast Iron or a responsive masterpiece like the All-Clad D3, you give yourself the best possible foundation. Remember: temper your meat, pat it dry, don’t crowd the pan, and for the love of all things delicious, let it rest before you dive in. With these 2026 techniques and tools, you are well on your way to being the hero of the dinner table.
FAQs
❓ How to cook chicken in frying pan juicy without oil?
✅ While difficult, you can use a high-quality nonstick like the T-fal Professional or HexClad. However, for the best moisture retention, a tiny amount of fat helps transfer heat evenly and prevents the surface from drying out…
❓ Should I cover the pan when cooking chicken?
✅ Yes, for thicker pieces. After the initial sear, covering the pan with a lid (like the one that comes with the All-Clad sets) traps heat and moisture, allowing the center to cook through without burning the exterior…
❓ Is it better to cook chicken fast or slow in a pan?
✅ A “Medium-High” start for a sear, followed by a “Medium” finish is ideal. Cooking too fast (High only) burns the outside, while cooking too slow (Low only) causes the juices to leak out before browning occurs…
❓ What is the best oil for juicy chicken?
✅ Use oils with high smoke points like Avocado or Grapeseed oil. These allow the pan to reach the temperatures needed for a proper sear without smoking or breaking down into unpleasant flavors…
❓ Can I use a cold pan to start chicken?
✅ Only for skin-on thighs! For breasts, you must preheat the pan. Starting a breast in a cold pan leads to sticking and a “rubbery” texture as the meat slowly warms up rather than searing…
Recommended for You
- How to Preheat Pan Correctly for Cooking: 7 Pro Secrets for Success
- Non toxic air fryer: The Ultimate Guide to Chemical Free Cooking in 2025 🔥
- Ninja 3 in 1 Air Fryer: Top Features That Transform Your Cooking in 2025
Disclaimer: This article contains affiliate links. As an Amazon Associate, I earn from qualifying purchases. If you purchase products through these links, we may earn a small commission at no additional cost to you.
✨ Found this helpful? Share it with your friends! 💬🤗