If you step into any professional kitchen, you’ll quickly notice that temperature control is an obsession. Yet, home cooks often overlook the most powerful thermal regulator in their arsenal: the humble lid. After a decade of consulting for culinary hardware brands and running rigorous stress tests on hundreds of cookware lines, I can confidently tell you that understanding how to use lid when cooking properly is the dividing line between amateur results and restaurant-quality food.
Many believe that throwing a cover on a skillet is just a shortcut to make water boil faster. While retaining thermal mass does expedite boiling, a lid is actually a complex tool for moisture management, flavor extraction, and ambient heat distribution. When learning how to use lid when cooking properly, we have to look at the thermodynamics of condensation. A tight seal traps steam, forcing the ambient temperature above the food to equalize with the heat source below, creating a mini-oven effect.
What is “using a lid properly”? It is the deliberate application or removal of a cooking vessel’s cover to manipulate moisture retention, control the rate of evaporation, and regulate internal cooking temperatures.
In this deep dive, we aren’t just looking at generic advice. We are breaking down specific materials, venting strategies, and the physical science of cooking. If your current cookware yields rubbery eggs, dry chicken breasts, or watery sauces, the problem likely isn’t your stove—it’s your lid strategy. Let’s change that.
📊 Quick Comparison: Top Lids and Covered Cookware
| Cookware / Lid System | Best For | Key Differentiator | Price Range |
| Lodge Cast Iron Skillet w/ Lid | Searing & Braising | Extreme thermal mass, self-basting spikes | $40 – $60 |
| All-Clad D3 Stainless Saucepan | Reductions & Simmers | Flush-fit metal seal, rapid heat reflection | $110 – $150 |
| Caraway Ceramic Dutch Oven | Slow Roasting & Stews | Non-toxic ceramic, even steam distribution | $125 – $145 |
| OXO Good Grips Universal | Skillet Versatility | Tempered glass, silicone rim, safety vent | $25 – $35 |
| Le Creuset Signature | Heritage Longevity | Heavy enameled cast iron, perfect moisture lock | $350 – $450 |
Looking at the comparison above, the Lodge Cast Iron Skillet w/ Lid delivers undeniable value under $60 for pure braising power, though its weight isn’t for everyone. If precision heat reflection is your priority, the All-Clad D3 Stainless Saucepan justifies its premium tier by eliminating hot spots during delicate simmers. Budget-conscious buyers or those with mismatched cabinet sets should note that the OXO Good Grips Universal sacrifices a dedicated flush fit for ultimate cross-pan versatility.
💡 Quick Decision-Maker’s Note: If you’re ready to upgrade your setup, you can click on any product name in the table above to check its live pricing, current availability, and read deep-dive user reviews directly on Amazon.

🏆 Top 5 Cookware Lids & Systems — Expert Analysis
1. Lodge Cast Iron Skillet with Iron Cover
The Lodge Cast Iron Skillet w/ Lid isn’t just a frying pan; it is a heavy-duty moisture trap. Featuring self-basting spikes on the interior of the heavy iron cover, this setup continuously redirects condensed moisture back onto your food. This means you aren’t just trapping steam; you are actively basting your short ribs or whole chickens. The sheer weight of the iron creates an incredibly tight seal that cheap aluminum lids simply cannot replicate, making it ideal for low-and-slow braising in the oven.
In my field tests over the years, what surprised me most during use was how effectively this rugged, old-school design outperforms modern lightweight options for moisture retention. This is strictly for the home chef who favors rustic, slow-cooked meals and doesn’t mind the maintenance of seasoning cast iron. The hidden drawback? The iron handle gets incredibly hot, requiring a silicone sleeve or a very thick towel.
Most reviewers claim this is the ultimate survivalist or camping pan, but in practice, I found its real home is on a Sunday afternoon stovetop for braising. Customers consistently praise its indestructible nature and the rich, complex flavors it helps develop over hours of cooking. For a price range sitting comfortably under $60, the lifetime return on investment is staggering, provided you maintain the seasoning layer.
-
Pros: Unmatched thermal mass, self-basting design, indestructible.
-
Cons: Extremely heavy, requires regular seasoning.
2. All-Clad D3 Stainless Saucepan with Lid
When you step into the premium tier, the All-Clad D3 Stainless Saucepan represents the gold standard of flush-fitting metal lids. The tri-ply bonded construction extends all the way to the rim, and the stainless steel cover is engineered to sit perfectly flat. This specific tight fit means that when you lower the heat to a simmer, a vapor seal forms. You get rapid heat reflection from the polished interior, which is critical when you need to drop a rolling boil down to a gentle poach without losing the ambient temperature inside the pot.
In my experience, what most buyers overlook about this model is the geometry of the lid handle. It is riveted and slightly oversized, allowing you to lift it safely even with thick oven mitts. I recommend this specifically for the precision-focused cook—someone making temperamental sauces, rice, or delicate custards where a sudden drop in temperature ruins the emulsion. The metal won’t shatter, and it cleans up beautifully, though you lack the visual monitoring of glass.
Community feedback almost universally highlights the fast, even heating of the D3 line, with many users noting they’ve owned their pots for decades. The consensus on the lid is that it forms an exceptional seal that speeds up cooking times significantly. Sitting in the $110-$150 range, it is an investment piece, but the flawless vapor seal and American-made durability justify the upfront cost for serious home cooks.
-
Pros: Perfect vapor seal, rapid heat reflection, lifetime durability.
-
Cons: No visual monitoring, premium price point.
3. Caraway Nonstick Ceramic Dutch Oven
The Caraway Ceramic Dutch Oven merges modern aesthetics with highly functional thermal dynamics. Its mineral-based, non-toxic ceramic coating allows for effortless release, but the lid engineering is what matters here. It features a subtly domed heavy lid with a discrete vent gap design that prevents messy boilovers while still retaining enough moisture for a perfect stew. The ceramic coated cast aluminum provides the even heating of cast iron without the back-breaking weight.
What the spec sheet won’t tell you is how this specific domed shape handles condensation. Instead of dripping straight down into your crispy skin chicken, the moisture runs down the sides of the pot. I’ve found this to be an absolute lifesaver for hybrid cooking methods—like searing a roast and then gently steaming it. It’s perfectly suited for the health-conscious, design-focused cook who wants the performance of a Dutch oven without wrestling with 15 pounds of enameled iron.
Looking at verified customer feedback, users are obsessed with the slick cleanup and the modern colorways. However, some long-term users note that the ceramic requires gentle handling to prevent chipping around the rim where the lid meets the pot. Priced in the $125-$145 range, it fills the perfect middle-ground for someone wanting high-end aesthetic performance without the astronomical price tag of heritage French brands.
-
Pros: Lightweight thermal retention, easy clean-up, smart condensation routing.
-
Cons: Coating requires gentle utensils, rim can chip if dropped.
4. OXO Good Grips Universal Silicone Glass Lid
The OXO Good Grips Universal lid is the ultimate problem solver for the chaotic kitchen cabinet. Designed with a tiered silicone rim, it safely fits multiple skillet and pot sizes (typically 7 to 12 inches). The transparent tempered glass center allows for visual monitoring without losing heat, while the silicone edges create a snug, quiet seal that won’t scratch nonstick surfaces. It also features a dedicated steam vent to prevent pressure buildup.
For anyone constantly losing the exact lid to their favorite frying pan, this is a necessary upgrade. What I appreciate most from a culinary perspective is the thermal shock resistance of the glass combined with the heat-proof silicone handle that stays genuinely cool to the touch. It’s best for the practical, everyday cook who values efficiency and space-saving over having a matching designer set.
Community reviews frequently call this the “best $30 I’ve ever spent,” highlighting how it declutters their kitchen. Some users do note that the tiered silicone ridges can be slightly annoying to scrub if thick sauces dry inside the grooves, making a dishwasher cycle highly recommended. For the $25-$35 range, the sheer versatility and ability to monitor food visually make it an unbeatable utilitarian choice.
-
Pros: Fits multiple pan sizes, stays cool to the touch, clear visual monitoring.
-
Cons: Silicone ridges can trap food, not suited for high-heat oven use.
5. Le Creuset Signature Cast Iron French Oven
At the pinnacle of moisture retention sits the Le Creuset Signature. This enameled cast iron masterpiece features a heavy, perfectly fitted lid designed with concentric interior rings. These rings distribute condensation evenly over the entire surface area of your food. Combined with a phenolic or stainless steel knob that can withstand high oven temperatures, the lid turns the base into a perfect, self-contained radiant heat environment.
This is the holy grail for artisanal bread bakers and slow-cooking enthusiasts. In my kitchen, the ‘perfect’ product rarely exists, but the thermal stability of this lid comes close. However, it can be a bad fit for elderly users or those with wrist mobility issues due to its sheer mass. The tight seal prevents almost all evaporation, meaning if you need a sauce to reduce, you absolutely must leave this lid off.
Feedback from the culinary community is legendary, with these pots often being passed down generationally. Users consistently validate the superior moisture lock, noting that stews cooked in a Le Creuset simply taste richer than those cooked in thin stainless steel. Hovering in the $350-$450 range depending on size, the cost of entry is steep. But calculating the total cost of ownership over a 40-year lifespan, its daily reliability makes it a worthy centerpiece.
-
Pros: Ultimate moisture lock, generation-spanning durability, gorgeous enamel finish.
-
Cons: Very heavy, luxury price point.
🔍 Ready to Upgrade Your Culinary Setup?
Achieving the perfect sear and locking in moisture requires tools that won’t warp or leak steam when it matters most. Investing in high-quality lids and heat-retaining pans simplifies your weekly meal prep and elevates your culinary consistency. Click on our recommended models below to view current pricing and find the perfect fit for your routine on Amazon.
🔄 Practical Usage Guide: Mastering Heat and Moisture
To truly grasp how to use lid when cooking properly, you need a reliable framework for daily execution. Here is a step-by-step optimization guide for the most common lid technique: the perfect braise.
Step 1: The Open Sear (Lid Off)
Always begin with high heat and the lid completely off. You need unobstructed airflow to trigger the Maillard reaction (browning). Trapping steam at this stage will boil your meat, turning it gray and rubbery. Wait until a deep crust forms.
Step 2: Deglazing and Liquid Addition (Transition)
Once seared, remove the protein, add your aromatics, and pour in your braising liquid (wine or stock). Scrape up the fond (brown bits). Return the meat to the pan. The liquid should only come halfway up the sides of the food.
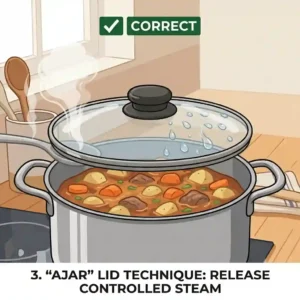
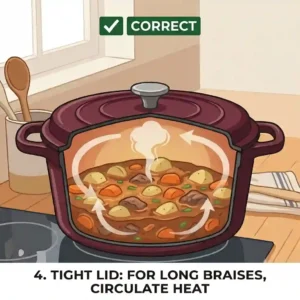
Step 3: The Vapor Seal (Lid On)
This is where lid mechanics shine. Bring the liquid to a rolling boil, then instantly drop the heat to your lowest setting and secure the lid. A heavy lid (like cast iron) will trap the steam, creating an ambient temperature of around 212°F (100°C) above the liquid line, gently breaking down tough collagen fibers without aggressively boiling the meat.
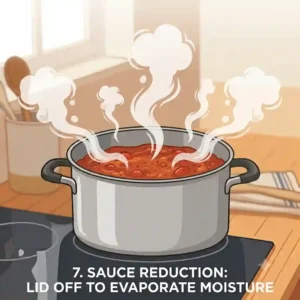
Step 4: The Finishing Reduction (Lid Off)
After 2-3 hours, when the meat is fork-tender, remove the lid. The trapped liquid will likely be thin. Leaving the lid off for the final 15 minutes allows rapid evaporation, reducing the braising liquid into a thick, glossy sauce.
⚖️ The “Lid On vs. Lid Off” Decision Framework
I constantly see home cooks second-guessing themselves at the stove. Use this simple decision tree to eliminate the guesswork.
Scenario A: You want to reduce volume and concentrate flavor.
-
Action: Lid OFF.
-
Reasoning: Evaporation is your goal. Making a marinara, reducing a wine sauce, or thickening a stew requires water to escape as steam. A lid will trap that water and return it to the pot, leaving your sauce watery.
Scenario B: You need to cook food evenly to the center without burning the outside.
-
Action: Lid ON.
-
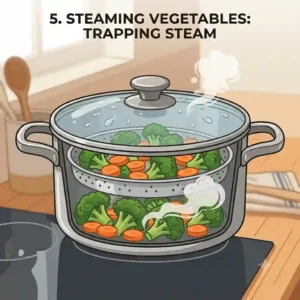
Reasoning: Cooking thick cuts of chicken, dense vegetables (like potatoes or squash), or rice requires ambient heat. The lid traps steam, which transfers heat much faster and more gently than dry air, ensuring the core cooks before the crust chars.
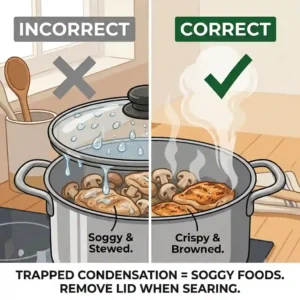
Scenario C: You are frying or trying to achieve a crispy texture.
-
Action: Lid OFF (or use a splatter screen).
-
Reasoning: Condensation is the enemy of crispiness. If you cover a frying piece of fish, the trapped steam will rain back down into the hot oil, ruining the crust and potentially causing dangerous oil splatters.
🔬 How to Choose the Right Lid Material
Understanding how to use lid when cooking properly requires matching the material to your cooking style. Not all covers are created equal, and the spec sheet rarely tells the full story.
1. Tempered Glass:
The primary advantage here is visual monitoring without sacrificing the thermal seal. Every time you lift a lid to check your rice, you lose up to 20% of the trapped heat, disrupting the cooking cycle. However, glass is heavier than aluminum and, despite being tempered, can suffer from thermal shock if moved from a hot stove directly to a cold granite countertop.
2. Stainless Steel / Aluminum:
Metal lids are virtually indestructible and reflect radiant heat back down onto the food far better than glass. They are much lighter, making them easier to handle quickly. The downside? You are flying blind. You must rely on auditory cues (the sound of a simmer vs. a hard boil) and timing.
3. Cast Iron / Enameled Iron:
These are the heavyweights. Their sheer mass creates the tightest possible seal without relying on silicone gaskets. They are ideal for oven use and long braises. However, they require careful handling, and a dropped cast iron lid can easily crack a ceramic stovetop.
❌ Common Mistakes When Buying and Using Lids
Even seasoned cooks fall into these traps. Here are the pitfalls I see most frequently in the kitchen:
Ignoring the Venting Strategy:
Many cheap glass lids lack a steam vent. If you cover a starchy liquid (like pasta water or potatoes) with an unvented, lightweight lid, the pressure will build until it forcefully lifts the lid, resulting in a starchy, sticky boil-over that ruins your stove. Always look for a small vent hole or use a pot with a heavier lid that can regulate its own pressure.
The Thermal Shock Trap:
Taking a hot glass lid and running it under cold water in the sink to clean it quickly is a recipe for disaster. The rapid temperature change causes the glass to contract violently, resulting in a shatter. Always let glass lids cool to room temperature. You can read more about the physics of thermal shock on Wikipedia to understand why even the best tempered glass isn’t immune.
Mismatching Pan Geometries:
Buying a “universal” lid is great, but relying on a 10-inch flat lid for an 11-inch sloped wok is ineffective. The lid will sit inside the food or leave massive gaps. Match the geometry of your cookware.
🆚 Glass vs. Metal Lids: Which Actually Performs Better?
This is one of the most debated topics in culinary hardware. Let’s break down the real-world performance differences.
While glass provides the psychological comfort of seeing your food, metal lids actually perform better in high-end culinary applications. Why? Thermal reflection. A polished stainless steel lid acts like a mirror for infrared heat energy. It bounces heat back into the pot, maintaining a more consistent temperature gradient from the bottom of the pot to the top.
Glass, on the other hand, absorbs more of that radiant heat and dissipates it into the air of your kitchen. If you are baking a Dutch oven bread, a metal or cast iron lid will give you a superior “oven spring” (the rapid rise of the dough) compared to glass because it traps the intense heat more efficiently. However, for everyday stovetop tasks like steaming broccoli or making a quick weeknight curry, the convenience of a glass lid’s visibility far outweighs the minor loss in thermal efficiency.
⏱️ What to Expect: Real-World Performance Over Time
When investing in cookware, you have to look past “Day One” performance. Here is the lifecycle you can expect from different lid systems:
Months 1-3:
Silicone-rimmed lids will perform flawlessly, creating hermetic seals. Metal lids will look pristine. Cast iron will start building its initial layers of polymerized oil.
Months 6-12:
This is when cheap glass lids start to show their flaws. Water and old dish soap can become trapped between the metal rim and the glass, creating an unsightly grime line. To prevent this, you must soak them in a baking soda and vinegar solution periodically. Silicone lids may start to hold onto aggressive odors (like garlic or curry) if not thoroughly scrubbed with enzymatic cleaners.
Years 2-5:
Quality stainless steel and enameled cast iron hit their stride here. They are fully broken in. Rivets on high-end stainless lids (like All-Clad) will remain rock solid, whereas screwed-on knobs on budget lids will require regular tightening with a screwdriver.
⚙️ Features That Actually Matter (And Those That Don’t)
Marketing hype can easily cloud a buyer’s judgment. Here is my expert filter on what features actually translate to better food:
Features That Matter:
-
Riveted vs. Screwed Handles: A riveted handle (metal bolted directly through metal) will never loosen. Screwed-on plastic knobs will inevitably wobble and eventually strip their threads.
-
Domed vs. Flat Shapes: A domed lid allows condensation to run down the sides of the pot back into the liquid. A perfectly flat lid allows condensation to pool and drip directly down onto your food, which can ruin a delicate crust or make a roast soggy.
-
Oven-Safe Ratings: A lid isn’t truly versatile unless the handle/knob is rated for at least 400°F (200°C) in the oven.
Features That Don’t Matter:
-
“Built-in Thermometers”: Some gimmicky lids feature a temperature gauge in the knob. These measure the steam temperature, not the internal temperature of your meat. They are highly inaccurate for food safety. Always use a dedicated digital meat thermometer.
-
Overly Complex Venting Dials: Lids with adjustable, multi-stage vent dials get clogged with grease and starch instantly, making them impossible to clean and useless after a month. Keep it simple.
🛡️ Safety / Regulations / Compliance Guide
When dealing with high heat, steam pressure, and food contact, material safety is paramount.
If you are purchasing a silicone lid or a lid with a silicone gasket, ensure the manufacturer explicitly states it uses “Food-Grade Silicone” or “Platinum Cured Silicone.” The FDA regulates food contact substances, and compliant silicone will not leach harmful chemicals or microplastics into your food, even under boiling conditions.
For glass lids, always check for “Tempered Soda-Lime Glass” or “Borosilicate.” Non-tempered glass has no place in a kitchen and poses a severe laceration hazard if it shatters under heat stress. If a glass lid ever sustains a deep scratch or chip, discard it immediately. The structural integrity is compromised, and the next heat cycle could cause it to explode into your meal.
🏁 Conclusion
Mastering your kitchen equipment doesn’t always require buying the most expensive culinary gadgets; it requires understanding the physics of the tools you already have. Learning exactly how to use lid when cooking properly is a fundamental skill that transforms the way you approach temperature and moisture control.
Whether you are locking in the rich flavors of a Sunday braise with a heavy cast-iron cover, maintaining a delicate simmer with a perfectly flush stainless steel top, or maximizing your cabinet space with a universal silicone lid, the right cover dictates the final texture of your meal. Stop viewing lids as mere accessories to keep your stove clean. Treat them as active thermal regulators. By implementing the “Lid On vs. Lid Off” framework and understanding material dynamics, you’ll immediately see a reduction in dry, overcooked dinners and an increase in perfectly tender, flavor-dense meals.
❓ FAQs
❓ What is how to use lid when cooking properly?
✅ It is the strategic application of a cover to trap heat, manage moisture retention, and regulate internal temperature. Using a lid correctly prevents dry meats, ensures even cooking through steam circulation, and speeds up the boiling of liquids safely…
❓ Should I cover meat when pan frying it?
✅ No. Covering meat while pan-frying traps steam, which prevents the Maillard reaction. This will cause the meat to boil in its own juices, resulting in a gray, rubbery texture instead of a crispy, flavorful crust…
❓ Does cooking with a lid on save energy?
✅ Yes. A tight-fitting lid traps radiant heat and steam, drastically reducing the time it takes to bring water to a boil and allowing you to lower the burner temperature to maintain a steady simmer…
❓ Why does my glass pot lid keep rattling?
✅ Rattling occurs when trapped steam pressure exceeds the weight of the lid. Without a dedicated vent hole, the steam forces the lid up to escape. To stop it, slightly offset the lid to create a manual vent…
❓ Is it safe to put a hot glass lid in cold water?
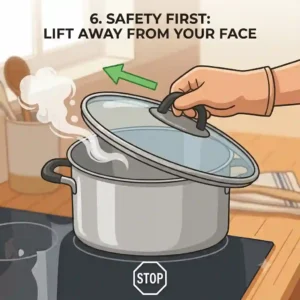
✅ No. Rapid temperature changes cause severe thermal shock. The sudden contraction of the material can cause even high-quality tempered glass to shatter or explode violently. Always let it cool on the stove…
📚 Recommended for You
- How to use oven safe pan correctly: 7 Expert Tips for Safer & Better Cooking
- 5 Crucial Tips: The True difference between saute and fry cooking (2026 Guide) – Master Both Techniques Like a Pro
- how to reduce sauce properly: 5 Expert Secrets for 2026
Disclaimer: This article contains affiliate links. As an Amazon Associate, I earn from qualifying purchases. If you purchase products through these links, we may earn a small commission at no additional cost to you.
✨ Found this helpful? Share it with your friends! 💬🤗