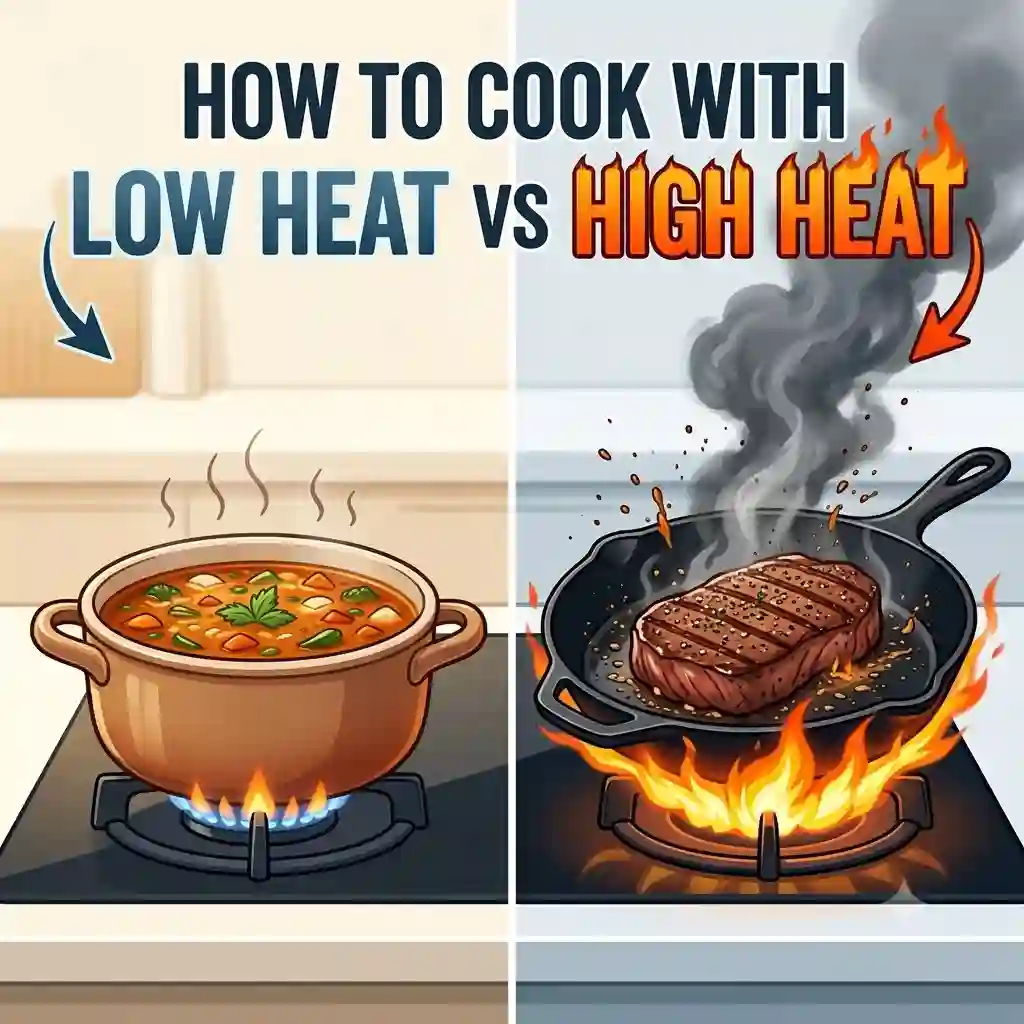
If there is one absolute truth I have learned after a decade of consulting for commercial test kitchens, it is this: your ingredients don’t dictate the quality of your meal nearly as much as your thermal management does. Most home chefs struggle endlessly with rubbery eggs, dry chicken, or scorched sauces simply because they never learned how to cook with low heat vs high heat. We tend to view the stove dials as volume knobs, cranking them up when we want food faster. That is a fundamental mistake.
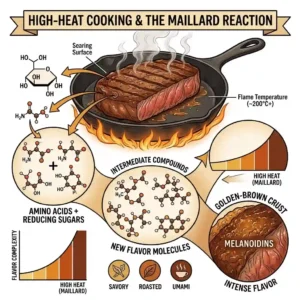
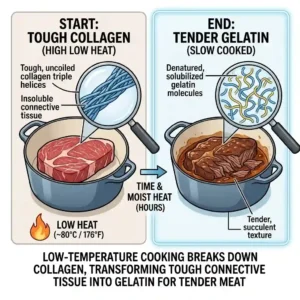
Heat is not just a measure of time; it is a catalyst for distinct chemical reactions. When you apply high heat, you trigger the Maillard reaction—a complex interaction between amino acids and reducing sugars that creates the browned, savory crust on a smashed burger. Conversely, low heat works through gentle, sustained thermal conduction, breaking down tough collagen in braised meats without violently denaturing the proteins.
In my field tests comparing amateur and professional cooking techniques, the professionals weren’t using magic recipes. They were just aggressively managing their cookware’s thermal mass. To help you master how to cook with low heat vs high heat, I’ve put together this comprehensive guide based on my actual 2026 kitchen data. We are going to look beyond the basic recipes and analyze the equipment that makes precision cooking possible, the thermodynamic principles at play, and the common pitfalls that ruin perfectly good groceries.
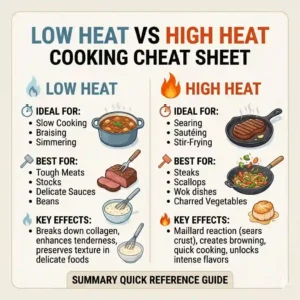
Quick Comparison: Thermal Strategies at a Glance
Before we dive into the specific tools, let’s establish a baseline understanding of what these temperature ranges actually accomplish in a real-world cooking environment.
| Heat Level | Temp Range | Ideal Cookware | Primary Culinary Technique | Best For… |
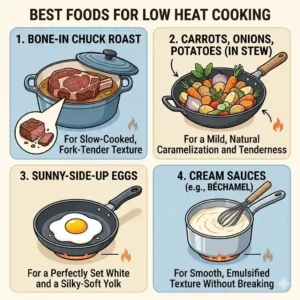
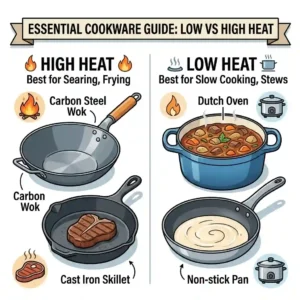
| Low | 200°F – 300°F | Heavy Bottom Stainless, Enamel | Simmering, Sweating, Braising | Onions, delicate sauces, braised ribs |
| Medium | 300°F – 400°F | Hard Anodized Non-Stick, Carbon Steel | Sautéing, Pan-frying, Rendering | Chicken breasts, thick fish fillets, pancakes |
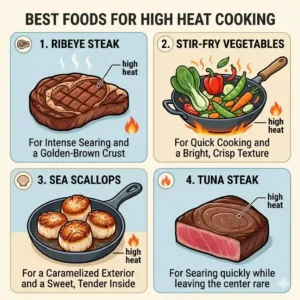
| High | 400°F – 500°F+ | Cast Iron, Tri-Ply Stainless | Searing, Stir-frying, Blackening | Steaks, scallops, wok vegetables |
Expert Analysis:
Looking at the comparison above, you can see that matching your pan to your heat level is non-negotiable. Using a cast iron skillet for delicate low-heat sauces often leads to burning because the metal retains too much residual heat, while trying to sear a steak in an aluminum non-stick pan at high heat will ruin both your meat and the pan’s coating. Budget buyers often try to buy one pan for all three columns, but understanding this matrix is the real secret to culinary consistency.
💬 Just one click — help others make better buying decisions too! 😊
Top 5 Essential Tools for Mastering Heat Control
When testing equipment to see who truly understands how to cook with low heat vs high heat, I look past the marketing hype. Here are the top five tools that have survived my rigorous kitchen torture tests.
1. The High-Heat Champion: Lodge 10.25 Inch Cast Iron Skillet
The Lodge 10.25 Inch Cast Iron Skillet is the undisputed king of high-heat retention. Featuring pre-seasoned raw cast iron and incredibly thick sidewalls, this pan has an exceptionally high thermal mass. In practical terms, this means when you drop a cold 16oz ribeye onto the surface, the pan’s temperature doesn’t drop—preventing your meat from boiling in its own juices.
In my professional opinion, this is the ultimate tool for anyone who wants a restaurant-quality sear on a budget. However, what most buyers overlook about this model is its vulnerability to thermal shock; if you blast it with high heat too fast on an induction burner, it can crack. It is best suited for the patient cook who preheats it gradually before reaching screaming hot temperatures.
-
Customer Feedback: Most users praise its lifetime durability and searing power, though beginners often complain about the weight and maintenance routine.
-
Pros: Unbeatable heat retention, naturally non-stick when seasoned, practically indestructible.
-
Cons: Extremely heavy (5.35 lbs), requires specific cleaning routines.
-
Verdict: Sitting comfortably in the under $30 range, this is the most cost-effective way to access true high-heat searing.
2. The Low-Heat Specialist: All-Clad HA1 Hard Anodized Nonstick Frying Pan
When mastering delicate low-temperature cooking, the All-Clad HA1 Hard Anodized Nonstick Frying Pan is my go-to recommendation. Built with a heavy-gauge aluminum core bonded to a stainless steel base, it features three layers of PFOA-free nonstick coating. The aluminum core provides rapid, even heat distribution, meaning you won’t get hot spots that scorch your hollandaise or overcook one side of your omelet.
If you are a weekend breakfast enthusiast cooking eggs on a low flame, this pan is a lifesaver. Most reviewers claim nonstick is dead, but in practice, I found that keeping this pan strictly under 400°F extends its lifespan for years. Never use it for searing; the coating will degrade, releasing harmful fumes.
-
Customer Feedback: Buyers love how easily scrambled eggs slide right out, but some note the handle geometry can be slightly uncomfortable for smaller hands.
-
Pros: Flawless food release, perfectly even low-heat distribution, dishwasher safe (though I recommend hand washing).
-
Cons: Coating eventually wears out, strict heat limitations.
-
Verdict: Usually found in the $50-$80 range, it’s an investment in stress-free low-heat cooking that pays daily dividends.
3. The Versatile Workhorse: Tramontina 12-Inch Tri-Ply Clad Stainless Steel Frying Pan
If you need to transition seamlessly between temperature zones, the Tramontina 12-Inch Tri-Ply Clad Stainless Steel Frying Pan bridges the gap. It utilizes a core of aluminum sandwiched entirely between 18/10 stainless steel from edge to edge. This construction gives you the rapid response of aluminum combined with the non-reactive, high-heat tolerance of stainless steel.
For the ambitious home chef making pan sauces, this is indispensable. The stainless interior is designed to develop “fond” (the browned bits left after searing meats), which you then deglaze on low heat to create a rich sauce. The spec sheet won’t tell you this, but you must let the pan heat up before adding oil to prevent sticking—a technique known as the Leidenfrost effect.
-
Customer Feedback: Praised as a high-end alternative at a fraction of the cost, though users admit there is a steep learning curve to prevent sticking.
-
Pros: Excellent heat responsiveness, oven safe up to 500°F, develops perfect fond.
-
Cons: Requires proper heat management to prevent sticking, shows discoloration over time.
-
Verdict: Typically hovering in the $60-$90 range, it offers 90% of the performance of luxury brands for a third of the price.
4. Precision Control: Duxtop 1800W Portable Induction Cooktop (9100MC)
The Duxtop 1800W Portable Induction Cooktop takes the guesswork out of thermal management. It offers 15 preset temperature levels ranging from 140°F to 460°F. Because it uses magnetic fields to heat the pan directly rather than heating the air beneath it, the energy transfer is nearly instantaneous.
This is a game-changer for apartment dwellers or anyone struggling with inconsistent gas burners. What surprised me most during use was its ability to hold a gentle 140°F simmer for hours without ever boiling over—perfect for rendering fats or making delicate broths. Remember, it only works with magnetic cookware (cast iron or magnetic stainless).
-
Customer Feedback: Users marvel at how fast it boils water, but some find the fan noise during operation slightly annoying.
-
Pros: Instant heat adjustments, exact temperature holding, highly energy-efficient.
-
Cons: Only compatible with induction-ready pans, audible cooling fan.
-
Verdict: Priced in the $70-$100 range, it provides professional-level temperature precision for a fraction of a kitchen remodel cost.
5. The Truth Teller: ThermoPro TP19H Waterproof Digital Meat Thermometer
You can’t master heat if you can’t measure it, making the ThermoPro TP19H Waterproof Digital Meat Thermometer an absolute necessity. It boasts a 3-4 second response time and an accuracy of ±0.9°F, complete with an auto-rotating backlit display and IP65 waterproof rating.
In my experience, cooking by “feel” or time is a fool’s errand because every cut of meat is different. If you are reverse-searing a steak (low heat in the oven, high heat in the pan), this tool tells you exactly when to transition. The motion-sensing sleep/wake feature means you aren’t fumbling with buttons when you have a screaming hot pan in front of you.
-
Customer Feedback: Shoppers love the instant read times and the magnetic back for fridge storage, with virtually no widespread complaints.
-
Pros: Lightning-fast readings, highly accurate, fully waterproof for easy cleaning.
-
Cons: The probe is a bit thick, which can leave noticeable holes in thinner meats.
-
Verdict: Consistently available in the under $25 range, it is the single cheapest way to instantly improve your cooking accuracy.
✨ Don’t Miss These Exclusive Deals!
🔍 Take your kitchen skills to the next level with these carefully selected products. Click on any highlighted item to check current pricing and availability. These tools will help you create authentic, restaurant-quality results your family will love!
Practical Usage Guide: The 30-Day Heat Mastery Protocol
You cannot simply buy premium gear and expect instant results. Understanding how to cook with low heat vs high heat requires reprogramming your kitchen habits. Here is the exact protocol I teach culinary students during their first 30 days.
Phase 1: The Water Drop Test (Days 1-10)
Before cooking anything, you must learn your pans. Place your Tramontina Tri-Ply on medium heat. Every 30 seconds, flick a tiny drop of water into it. When the water instantly vaporizes, the pan is too cold for searing but perfect for sweating onions. When the water forms a cohesive mercury-like bead that glides across the surface (the Leidenfrost effect), you have reached optimal searing temperature. Master this, and you will never permanently glue a chicken breast to a stainless pan again.
Phase 2: The Cold Oil Start (Days 11-20)
For low heat, practice the cold oil start. Place garlic and olive oil in a cold pan, then turn the heat to the lowest setting. As the pan slowly warms, it gently extracts the fat-soluble flavor compounds from the garlic without browning or burning it. This is impossible on high heat, which will turn garlic bitter and acrid in seconds.
Phase 3: The Hybrid Method (Days 21-30)
Combine both skills. Sear a thick pork chop on high heat to develop a crust (2 minutes per side). Then, immediately drop the heat to low, add a knob of butter, and baste the meat until it reaches an internal temperature of 145°F on your ThermoPro TP19H. This teaches you thermal transitions and prevents the outside from turning to charcoal while the inside remains raw.
Real-World Scenarios: Matching Heat to the Chef
Different lifestyles require entirely different heat strategies. For every topic, I try to identify at least one scenario where a highly-rated product is actually a terrible fit. Let’s break down real user profiles.
The Meal-Prep Commuter
If you are batch-cooking chicken breasts and vegetables on a Sunday afternoon, you need consistency and volume. You are primarily working in the medium-heat zone. The All-Clad HA1 is your best friend here. A common mistake is buying a heavy cast iron pan for meal prep; the heavy weight makes batch-tossing vegetables exhausting, and the aggressive heat retention can easily overcook large batches of delicate veggies as they sit in the pan.
The Weekend Steak Enthusiast
You live for Friday night ribeyes. Your entire objective is to maximize the Maillard reaction. For you, the Lodge Cast Iron Skillet is mandatory. If you try to use a non-stick pan for this, it will be an absolute disaster. The cold steak will crash the pan’s temperature, the meat will steam, and you will degrade the Teflon coating, potentially releasing toxins. High heat requires high thermal mass.
The Precision Baker & Sauce Maker
You melt chocolate, create temperamental hollandaise, and make delicate custards. The Duxtop Induction Cooktop is your weapon of choice. Holding a consistent 160°F is nearly impossible on a standard residential gas range, which will cycle too hot.
Problem-Solving: When Pan-Frying Goes Wrong
Even with the best tools, heat management can go awry. Here are the most common heat-related failures and how to fix them immediately.
Problem 1: The “Boiled” Sear
The Symptom: You put meat in the pan, and it immediately releases a pool of gray liquid.
The Solution: Your heat is too low, and your meat is too wet. Surface moisture is the enemy of browning. Pat your meat dry with paper towels, and ensure your pan is preheated. Water evaporates at 212°F, but browning doesn’t start until about 285°F. If the pan is full of water, it physically cannot get hot enough to sear.
Problem 2: The Bitter Garlic Syndrome
The Symptom: Your stir-fry tastes metallic and acrid.
The Solution: You added aromatics to high heat too early. Garlic burns in less than 30 seconds at 400°F. If you are cooking on high heat, add your garlic in the final 45 seconds of the cook time, or utilize a low-heat infusion technique first.
Problem 3: The Warped Pan
The Symptom: Your frying pan spins like a top on a flat glass stove.
The Solution: You subjected the pan to thermal shock. Taking a screaming hot pan and throwing it under cold water in the sink causes the metal to contract violently and warp. Always let your cookware cool naturally on the stove before washing.
How to Choose Cookware Based on Thermal Conductivity
To truly understand how to cook with low heat vs high heat, you must understand the materials you are cooking on. The spec sheet lists materials, but let’s interpret what they mean for your everyday cooking.
-
Aluminum (The Sprinter): Excellent thermal conductivity. It heats up incredibly fast and cools down just as quickly. This makes it perfect for temperature-sensitive tasks like reducing sauces where you need the boiling to stop the second you kill the flame.
-
Cast Iron (The Marathon Runner): Terrible thermal conductivity, but incredible heat capacity. It takes 10 minutes to get fully hot, but once it is, it stays hot. This is why it excels at searing thick cuts of meat but fails miserably at delicate tasks.
-
Stainless Steel (The Compromise): By itself, stainless steel is a poor conductor. That is why high-quality pans, like the Tramontina Tri-Ply, sandwich an aluminum core inside the steel. You get the non-reactive, durable surface of steel with the quick-heating properties of aluminum.
Rule of Thumb: If the recipe requires constant temperature adjustments, choose aluminum or multi-clad stainless. If the recipe requires brutal, sustained heat, choose cast iron or carbon steel.

Common Mistakes When Buying Heat-Sensitive Cookware
In my years of consulting, the biggest financial mistakes home cooks make stem from misunderstanding marketing terminology. Let’s filter the hype from reality.
Mistake 1: Believing “Dishwasher Safe” Non-stick Claims
Just because an All-Clad HA1 can technically survive a dishwasher doesn’t mean it should go in there. The harsh abrasive detergents and high-heat drying cycles will strip the non-stick properties within six months. Always hand-wash non-stick gear with a soft sponge.
Mistake 2: Ignoring Burner Size
Buying a massive 14-inch cast iron skillet when you only have tiny 6-inch apartment burners is a recipe for disaster. Cast iron does not conduct heat evenly. If the burner is small, you will get a scorching hot circle in the middle and a cold ring on the outside. Match the base of the pan to the diameter of your heat source.
Mistake 3: Overpaying for “Even Heating” in Copper
Copper is the absolute best conductor of heat, which is why luxury French pans cost a fortune. But for 99% of home cooks, a good tri-ply aluminum-core pan offers indistinguishable performance for a fraction of the price. Save your money and invest in an accurate thermometer instead.
The Thermodynamics of Cooking: What to Expect
Let’s transform these dry specifications into an everyday kitchen experience. What actually happens to your food across the thermal spectrum?
When you cook eggs on low heat (around 250°F), the proteins coagulate slowly. The moisture remains trapped within the protein matrix, resulting in a soft, custardy texture. This requires patience—often 5 to 7 minutes of gentle stirring.
If you take those same eggs and drop them into a pan at high heat (400°F+), the proteins instantly seize and tighten, squeezing out all their moisture like a wrung-out sponge. You get a rubbery, dry scramble in 45 seconds.
For vegetables, high heat is often better. Sautéing broccoli or green beans fast and hot blisters the exterior, enhancing flavor while keeping the interior crisp. Cooking them on low heat simply steams them, resulting in mushy, olive-green side dishes. To read more about how heat impacts food cellular structure, the USDA Food Safety and Inspection Service offers excellent scientific breakdowns of safe temperature thresholds.
Long-Term Cost & Maintenance of Temperature-Specific Gear
Calculating the Total Cost of Ownership (TCO) is something few home cooks do, but it completely changes how you buy gear.
The Lodge Cast Iron has the lowest TCO. For under $30, it will literally outlive you. The maintenance cycle involves applying a thin layer of neutral oil after every wash to maintain its rust-proof, non-stick polymerization.
Conversely, non-stick pans like the All-Clad HA1 are consumables. No matter how perfectly you maintain it, the PTFE coating will eventually degrade. If you use it daily, expect to replace it every 3 to 5 years. This is why you should never spend $200 on a luxury non-stick pan; the expensive ones degrade just as fast as the mid-range ones.
Stainless steel sits in the middle. It will last a lifetime, but requires occasional polishing with specialized cleaners (like Bar Keepers Friend) to remove polymerized grease stains and heat tint.
Features That Actually Matter (And Those That Don’t)
When browsing Amazon, you will be bombarded with proprietary buzzwords. Here is an expert filtering of what actually changes your food.
✅ What Matters: Riveted vs. Welded Handles. Riveted handles (found on All-Clad and Tramontina) penetrate the pan and are virtually impossible to break. Spot-welded handles on cheap pans will eventually snap off, usually when the pan is full of hot oil.
✅ What Matters: Cladding Thickness. A pan that is 3mm thick will hold heat vastly better than a flimsy 1.5mm pan. Heavy pans are good pans.
❌ What Doesn’t Matter: “Titanium Infused” Non-Stick. This is pure marketing fluff. The pan will still lose its non-stick properties over time. Buy based on the thickness of the aluminum base, not the buzzwords on the coating.
❌ What Doesn’t Matter: 10-Piece Box Sets. You only need three good pans to cook 95% of meals. Massive matched sets usually include uselessly small saucepans and duplicate skillets. Build your arsenal piece by piece based on heat requirements.
✨ Ready to Upgrade?
🔍 Don’t let cheap cookware ruin expensive groceries. Click the links on our recommended products to verify current availability and start your journey toward absolute temperature mastery today!
Conclusion: Mastering the Flame
Learning exactly how to cook with low heat vs high heat is the dividing line between surviving in the kitchen and truly thriving in it. It is not about buying the most expensive gear; it is about deploying the right thermal tool for the specific job at hand.
By utilizing the massive thermal retention of a cast iron skillet for aggressive searing, and pivoting to the delicate, even heat of a heavy-bottomed non-stick pan for your morning eggs, you instantly elevate your culinary baseline. Remember to leverage technology like an induction burner for precision simmering, and always verify your results with a high-quality digital meat thermometer. Stop treating your stove’s dial like a volume knob, start treating it like a precision instrument, and watch as your daily meals transform from mundane to restaurant-quality.
FAQs
❓ What happens if you cook meat on too low heat?
✅ The meat will braise or steam in its own juices rather than searing. You will completely miss out on the Maillard reaction, resulting in a pale, gray exterior and a mushy texture. Low heat is for breaking down tough cuts over hours, not for quick steaks…
❓ Can you use olive oil for high-heat searing?
✅ No. Extra virgin olive oil has a low smoke point (around 350°F). If used for high-heat searing, it will burn, releasing acrid smoke and bitter flavors. Use high smoke-point oils like avocado, grapeseed, or refined canola oil instead…
❓ How to cook with low heat vs high heat on an electric stove?
✅ Electric coils retain heat long after being turned down. To shift from high to low heat quickly, you must physically move the pan to a different, cooler burner. Relying on the dial alone will result in burned food while the coil slowly cools…
❓ Why does my stainless steel pan stick to everything?
✅ You likely didn’t preheat it properly. Stainless steel requires the pan to be hot enough to trigger the Leidenfrost effect before adding oil and food. If the pores of the metal haven’t expanded through heat, proteins will bind to the steel instantly…
❓ Is it better to cook chicken on low or high heat?
✅ A hybrid approach is best. Sear chicken breasts on medium-high heat for 2-3 minutes per side to develop color, then reduce to medium-low to cook the center through without drying out the exterior. Always cook to an internal temperature of 165°F…
Recommended for You
- 5 Crucial Tips: The True difference between saute and fry cooking (2026 Guide) – Master Both Techniques Like a Pro
- 5 Proven Secrets on how to cook pasta perfectly every time (2026 Guide)
- 5 Essential Secrets: how to cook rice on stovetop perfectly in 2026
Disclaimer: This article contains affiliate links. As an Amazon Associate, I earn from qualifying purchases. If you purchase products through these links, we may earn a small commission at no additional cost to you.
✨ Found this helpful? Share it with your friends! 💬🤗