

Illuminating Your Culinary Canvas 🔆
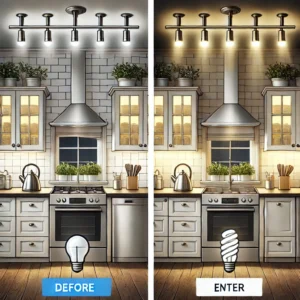
Walking into a perfectly lit kitchen feels like stepping into a professional cooking show set. The right lighting transforms not just how your kitchen looks, but how it functions and feels. At the heart of modern kitchen lighting design, can lights in kitchen setups have become the gold standard for homeowners who want both functionality and style.
I’ve spent years renovating kitchens and experimenting with various lighting configurations, and I can confidently say that recessed can lights deliver that perfect balance of ambient illumination and task lighting that every kitchen desperately needs. Whether you’re chopping vegetables, reading recipes, or simply enjoying a midnight snack, proper lighting makes all the difference.
In this comprehensive guide, we’ll explore everything you need to know about installing can lights in your kitchen. From understanding the basics to selecting the perfect fixtures for your specific space, I’ll walk you through the entire process with expert advice that comes from both professional experience and countless kitchen renovations.
What Are Can Lights and Why They’re Perfect for Kitchens? ⚡
Can lights, also known as recessed lights or downlights, are lighting fixtures that sit flush with your ceiling, creating a clean, streamlined look. Unlike pendant lights or chandeliers that hang down, can lights in kitchen ceilings are installed into a hollow opening, with only the trim and part of the inner baffle visible.
The Anatomy of Can Lights 🔍
Before diving deeper, let’s break down what makes up a typical can light:
✅ Housing: The “can” part that’s installed inside your ceiling ✅ Trim: The visible portion that sits flush with the ceiling ✅ Bulb/LED module: The light source inside the housing ✅ Baffle/Reflector: Controls how light is distributed
Why Can Lights Have Become Kitchen Essentials
There are several compelling reasons why can lights in kitchen spaces have become so popular:
- Space Efficiency: They don’t take up valuable headroom, making them perfect for kitchens with standard ceiling heights.
- Even Illumination: When properly placed, they provide consistent lighting throughout the kitchen.
- Design Versatility: Available in various sizes, finishes, and light temperatures to match any kitchen style.
- Task-Oriented Lighting: They can be strategically positioned over workspaces like countertops and islands.
- Modern Aesthetic: They create a clean, uncluttered look that complements contemporary kitchen designs.
As a kitchen designer, I’ve noticed that homeowners who install can lights often report their kitchens feeling larger and more inviting. The recessed nature of these fixtures creates an open feeling that other lighting options simply can’t match.
Planning Your Can Lights in Kitchen: The Perfect Layout 📐
The effectiveness of can lights in kitchen spaces depends significantly on their placement. Poor planning can result in shadows over workspaces or harsh lighting that creates an uncomfortable cooking environment.
Calculating the Right Number of Can Lights
To determine how many can lights your kitchen needs, follow this simple formula:
- Multiply your kitchen’s square footage by 1.5 to get the total wattage needed
- Divide the total wattage by the wattage of your chosen bulbs
- The result gives you the approximate number of fixtures needed
For example, in a 120-square-foot kitchen:
- 120 × 1.5 = 180 total watts needed
- Using 12-watt LED can lights: 180 ÷ 12 = 15 fixtures
However, this is just a starting point. Your kitchen’s specific layout, ceiling height, and design preferences will influence the final number.
Strategic Placement for Maximum Effect
When planning can lights in kitchen layouts, consider these expert-recommended guidelines:
✅ General Rule of Spacing: Position lights 4-6 feet apart for even illumination ✅ Distance from Walls: Place can lights 2-3 feet away from walls to avoid harsh shadows ✅ Work Areas: Ensure additional lights above primary work surfaces like islands and countertops ✅ Avoid Shadows: Consider where you’ll be standing when working to prevent casting shadows
I recently renovated a client’s galley kitchen where we installed two parallel rows of can lights, ensuring that no matter where they stood, they weren’t working in their own shadow. The transformation was remarkable—suddenly, the narrow space felt brighter and more functional.
Mapping It Out: Creating Your Kitchen Lighting Plan
Before making any purchases or certainly before cutting holes in your ceiling, create a detailed lighting plan:
- Draw Your Kitchen to Scale: Include all countertops, islands, and appliances
- Mark Primary Work Areas: Identify where you prep food, cook, and clean
- Plot Light Positions: Start with task areas, then fill in with ambient lighting
- Consider Other Light Sources: Account for existing windows, under-cabinet lighting, or pendant lights
Creating this map will help you visualize how can lights in kitchen ceilings will work with your specific layout, potentially saving you from costly mistakes.
Choosing the Right Can Lights for Your Kitchen 💡
With countless options on the market, selecting the perfect can lights can feel overwhelming. Let’s break down the key factors to consider:
Housing Types: New Construction vs. Remodel
When installing can lights in kitchen renovations, you’ll need to choose between:
- New Construction Housing: Designed for installation during building or major renovations when ceiling joists are exposed
- Remodel Housing: Designed for installation in existing ceilings through small openings
If you’re upgrading your kitchen lighting without removing the ceiling, remodel housings are your best bet. They’re designed to be installed through relatively small holes in the ceiling and secured from below.
Size Matters: Choosing the Right Diameter
Can lights typically come in 4-inch, 5-inch, and 6-inch diameters, with larger options available for specific applications:
| Size | Best Used For | Typical Placement |
|---|---|---|
| 4-inch | Accent lighting, small spaces | Above counters, in soffits |
| 5-inch | All-purpose kitchen lighting | General ceiling placement |
| 6-inch | Primary kitchen illumination | Main ceiling areas, over islands |
In most residential kitchens, 5-inch or 6-inch can lights in kitchen installations provide the best combination of light output and aesthetic appeal.
Light Source: LED vs. Traditional Bulbs
While traditional incandescent and halogen bulbs were once standard for can lights, LED options have become the superior choice for modern kitchens:
✅ Energy Efficiency: LEDs use up to 75% less energy ✅ Longevity: Quality LED can lights last 15-25 years ✅ Heat Reduction: LEDs emit less heat, important in a kitchen environment ✅ Dimming Capability: Modern LED can lights offer excellent dimming options ✅ Color Temperature Options: Available in various light temperatures to suit your preference
For today’s can lights in kitchen installations, I always recommend integrated LED fixtures or retrofittable LED modules that replace traditional bulbs.
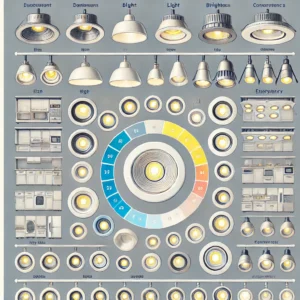
Color Temperature: Creating the Right Mood
The color temperature of your can lights significantly impacts both the functionality and feel of your kitchen:
- 2700-3000K (Warm White): Creates a cozy, inviting atmosphere
- 3500-4000K (Neutral White): Provides bright, functional lighting ideal for task areas
- 5000K+ (Cool White): Delivers very bright light that mimics daylight
Most homeowners prefer neutral white (3500K) for can lights in kitchen areas, as it offers excellent visibility for cooking tasks while still feeling welcoming and comfortable.
Top-Rated Can Lights for Kitchen Installations in 2025 🌟
Based on performance, durability, and customer satisfaction, here are some of the best can lights currently available on Amazon for your kitchen renovation:
Premium Pick: Halo RL 5-inch and 6-inch Retrofit LED Recessed Light Kit
This all-in-one solution from industry leader Halo has revolutionized how I approach can lights in kitchen installations. The integrated LED and trim design eliminates the need for separate housings while delivering exceptional light quality and energy efficiency.
Best Value: Sunco Lighting 12 Pack 6-inch Ultra-Thin LED Recessed Lights
For those tackling larger kitchen spaces, this multi-pack offers incredible value without compromising quality. The ultra-thin design makes these perfect for kitchens with ceiling obstructions like joists or HVAC ducts.
Most Versatile: Philips Hue White Ambiance Smart Retrofit Recessed Downlight
For tech-savvy homeowners, these smart can lights in kitchen setups allow you to adjust brightness and color temperature via smartphone or voice commands. They integrate seamlessly with other smart home systems, giving you unprecedented control over your kitchen lighting.
Comparison of Top Can Lights for Kitchen Installation
| Product | Size | Type | Smart Features | Brightness (Lumens) | Lifespan | Price Range |
|---|---|---|---|---|---|---|
| Halo RL LED Kit | 5″/6″ | Retrofit LED | Dimmable | 900 | 50,000 hrs | $$$$ |
| Sunco 6″ Ultra-Thin | 6″ | Thin Wafer | Dimmable | 850 | 35,000 hrs | $$ |
| Philips Hue Smart | 5″/6″ | Smart Retrofit | Full Smart Control | 680 | 25,000 hrs | $$$$$ |
Ready to transform your kitchen with professional-quality lighting? Check out these top-rated can lights and experience the dramatic difference proper lighting makes in your cooking space. These fixtures represent the current gold standard for can lights in kitchen installations and will serve you well for years to come.
Transform your kitchen today! Click on any of the recommended products above to check current pricing and bring professional-quality lighting to your home. The right can lights will not only improve visibility but also increase your kitchen’s overall aesthetic appeal and value.
Installation Guide: DIY or Professional? 🛠️
Installing can lights in kitchen ceilings can range from a straightforward DIY project to a complex task requiring professional help, depending on your specific situation.
When to DIY vs. When to Hire a Pro
Consider these factors when deciding whether to tackle installation yourself:
✅ DIY-Friendly Scenarios:
- Replacing existing recessed fixtures with retrofit LEDs
- Installing new lights in an accessible attic space
- Basic installations with straightforward wiring
- Using ultra-thin wafer lights that don’t require housing
⚠️ Call a Professional When:
- Working with concrete or challenging ceiling materials
- Adding new circuits or significant electrical modifications
- Dealing with insulated ceiling spaces (IC-rated fixtures required)
- Installing in homes with aluminum wiring or outdated electrical systems
As someone who’s installed countless can lights in kitchen renovations, I can attest that what seems like a simple project can quickly become complicated when you open up your ceiling.
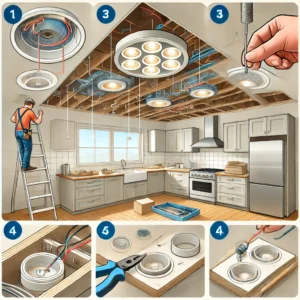
Basic DIY Installation Steps
If you’re comfortable with basic electrical work and your project is straightforward, here’s an overview of the installation process:
- Turn off power at the breaker box
- Mark light locations according to your plan
- Locate ceiling joists using a stud finder
- Cut holes for the housings using the provided template
- Run electrical wiring between fixtures (if needed)
- Connect wiring to the housings following manufacturer instructions
- Install housings in ceiling holes
- Attach trim pieces and insert light bulbs or LED modules
- Restore power and test your new lights
Always follow manufacturer instructions specific to your chosen can lights in kitchen fixtures, as installation details vary between models.
Safety First: Electrical Considerations
Working with electricity carries inherent risks, so take these precautions:
- Verify power is off using a non-contact voltage tester
- Follow local building codes for kitchen lighting
- Use proper wire connectors rated for your application
- Consider fire safety with proper IC-rated (insulation contact) fixtures if needed
- Install GFCI protection if required by local code
If you’re uncertain about any aspect of the electrical work, consult a licensed electrician. The safety of your home and family isn’t worth the risk of an improper installation.
Energy Efficiency and Cost Considerations 💰
Modern can lights in kitchen installations offer significant energy savings compared to older lighting technologies, but there are still important choices to make to maximize efficiency.
Energy-Saving Features to Look For
When selecting can lights for your kitchen, prioritize these energy-efficient features:
✅ ENERGY STAR Certification: Indicates the fixture meets strict efficiency guidelines ✅ High Lumens-per-Watt Ratio: More light output for less energy consumption ✅ Dimmable Capability: Allows you to use only the light you need ✅ Automatic Shutoff/Motion Sensors: Ideal for pantries or other less-used kitchen areas ✅ Smart Controls: Enable scheduling and remote management of your lighting
Many of my clients are surprised by how quickly energy-efficient can lights in kitchen installations pay for themselves through reduced electricity bills.
Long-Term Cost Analysis
While LED can lights typically cost more upfront than traditional options, they offer substantial long-term savings:
| Lighting Type | Initial Cost | Energy Cost (10 years) | Replacement Bulbs (10 years) | Total 10-Year Cost |
|---|---|---|---|---|
| Traditional Incandescent | $15-25 | $438 | $50 (10 replacements) | $503-513 |
| Halogen | $20-30 | $328 | $40 (5 replacements) | $388-398 |
| LED | $35-60 | $73 | $0 (no replacements needed) | $108-133 |
Based on 3 hours of daily use at average US electricity rates for a single fixture
As this analysis shows, quality LED can lights in kitchen installations typically pay for their higher initial cost within 2-3 years, then continue saving you money for decades.
Styling Your Kitchen with Can Lights: Design Tips 🎨
The beauty of can lights in kitchen designs lies in their versatility. Here’s how to use them effectively in different kitchen styles:
Complementing Various Kitchen Styles
Different kitchen aesthetics benefit from unique approaches to recessed lighting:
✅ Modern/Contemporary: Use clean, white trims and cooler light temperatures (3500-4000K) ✅ Traditional/Farmhouse: Choose warmer light (2700-3000K) with bronze or brushed nickel trims ✅ Industrial: Black trims with neutral light temperatures complement exposed brick or pipes ✅ Minimalist: Ultra-thin, trimless recessed lights for a seamless ceiling appearance
The key is selecting can lights in kitchen fixtures that complement your overall design without drawing attention to themselves.
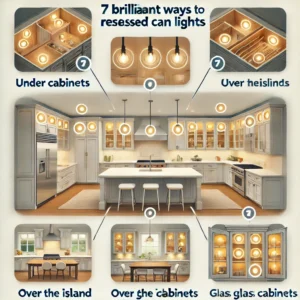
Combining Can Lights with Other Lighting Types
For truly spectacular kitchen lighting, layer can lights with other fixture types:
- Can Lights: Provide general ambient illumination from above
- Pendant Lights: Add style and focused light over islands or dining areas
- Under-Cabinet Lighting: Eliminates shadows on work surfaces
- Interior Cabinet Lighting: Highlights displayed items and aids in finding items
- Toe Kick Lighting: Adds a floating effect and nighttime pathway illumination
This layered approach ensures your kitchen has appropriate lighting for every task while creating visual interest and depth. When designing can lights in kitchen layouts, always consider how they’ll work alongside these complementary light sources.
Creating Zones with Strategic Lighting
Use can lights to define different functional areas within your kitchen:
✅ Cooking Zone: Brighter, task-oriented lighting directly above the stovetop and prep areas ✅ Dining Zone: Softer, dimmable lighting for comfortable meals ✅ Cleaning Zone: Bright, shadow-free lighting around the sink and dishwasher areas ✅ Storage Zone: Focused lighting for pantries and cabinets to help locate items
In my experience redesigning kitchens, this zoned approach to can lights in kitchen spaces dramatically improves both functionality and the overall experience of using the kitchen. Proper lighting makes cooking more enjoyable and reduces eye strain during food preparation.
Common Mistakes to Avoid with Kitchen Can Lights ⚠️
After installing can lights in kitchen spaces for years, I’ve seen homeowners make several common mistakes. Here’s how to avoid them:
Mistake #1: Improper Spacing and Placement
Perhaps the most common error is placing can lights in a pattern that looks symmetrical on paper but doesn’t account for actual kitchen activities.
❌ The Grid Pattern Trap: Installing lights in a perfect grid regardless of workspaces ✅ Better Approach: Position lights based on task areas and where you’ll stand while working
One client insisted on perfect grid alignment for their kitchen can lights. After installation, they discovered dark shadows exactly where they prepared food most often. Remember that function should guide placement for can lights in kitchen layouts.
Mistake #2: Installing the Wrong Size
Choosing can lights that are too large or too small for your space can throw off the entire kitchen aesthetic.
❌ One-Size-Fits-All Thinking: Using the same size throughout regardless of ceiling height or room dimensions ✅ Better Approach: Match can light size to room dimensions (larger rooms/higher ceilings = larger can lights)
In smaller kitchens with standard 8-foot ceilings, 4-inch or 5-inch can lights in kitchen installations typically look more proportional, while larger or open-concept kitchens can handle 6-inch fixtures.
Mistake #3: Inadequate Dimming Controls
Installing great can lights but pairing them with inadequate controls limits their functionality.
❌ Basic On/Off Switches Only: Missing the opportunity for mood lighting and energy savings ✅ Better Approach: Install compatible dimmers for all kitchen lighting zones
Modern can lights in kitchen setups should always include quality dimming controls, preferably with preset scenes for different activities (cooking, dining, cleaning).
Mistake #4: Neglecting Color Temperature Consistency
Mixing light temperatures creates an unprofessional, disjointed appearance.
❌ Temperature Mismatch: Combining cool white can lights with warm under-cabinet lighting ✅ Better Approach: Maintain consistent color temperature across all kitchen lighting
For a cohesive look, ensure all your can lights in kitchen fixtures match other light sources in temperature, typically 2700-3000K for warm or 3500-4000K for neutral white light.
Smart Integration: Modernizing Your Kitchen Lighting 📱
The latest innovation in can lights in kitchen technology is smart integration, allowing unprecedented control over your lighting.
Benefits of Smart Can Lights
Smart recessed lighting offers several advantages over traditional systems:
✅ Remote Control: Adjust lighting from your smartphone or tablet ✅ Voice Commands: Compatible with Amazon Alexa, Google Assistant, and Apple HomeKit ✅ Scheduling: Program lights to automatically adjust throughout the day ✅ Scene Setting: Create and save custom lighting configurations for different activities ✅ Vacation Mode: Simulate occupancy while you’re away for security
One of my clients installed smart can lights in kitchen areas and programmed them to automatically brighten in the morning for breakfast preparation, then dim to a warmer tone in the evening for a more relaxed dinner atmosphere.
Top Smart Can Light Options
If you’re ready to upgrade to smart kitchen lighting, consider these excellent options:
- Philips Hue White and Color Ambiance Retrofit Recessed Downlight: Offers 16 million colors and integrates with the most popular smart home systems
- Lutron Caseta Smart Lighting Dimmer Switch Kit: Controls existing can lights with smart functionality through replacement switches
- LIFX Downlight: Requires no hub and connects directly to Wi-Fi for easy setup
While smart can lights in kitchen installations typically cost more initially, they offer unparalleled convenience and can actually save energy through more precise control.
Smart Systems Comparison
| Smart System | Hub Required | Voice Assistant Compatibility | Color Changing | Scenes/Routines | Price Range |
|---|---|---|---|---|---|
| Philips Hue | Yes | Alexa, Google, HomeKit | Yes | Yes | $$ |
| Lutron Caseta | Yes | Alexa, Google, HomeKit | No | Yes | $$ |
| LIFX | No | Alexa, Google, HomeKit | Yes | Yes | $$ |
Upgrade your kitchen lighting experience today! These smart systems transform ordinary can lights in kitchen installations into extraordinary, customizable lighting experiences that enhance both functionality and ambiance.
Maintenance and Troubleshooting Tips 🔧
Even the best can lights in kitchen installations require occasional maintenance. Here’s how to keep yours functioning optimally:
Regular Maintenance Schedule
Maintain your kitchen can lights with these simple steps:
✅ Monthly: Dust visible trim and bulb surfaces with a soft cloth ✅ Quarterly: Check for and tighten any loose trims ✅ Annually: Turn off power and remove trims to clean inside reflectors ✅ Every 2-5 Years: Check connections and replace any aging components
Regular maintenance prevents dust buildup that can reduce light output and potentially cause overheating in can lights in kitchen fixtures.
Troubleshooting Common Issues
When problems arise with your kitchen can lights, try these solutions:
Flickering Lights
- Check bulb installation: Ensure LED modules are properly seated
- Inspect connections: Look for loose wires at the fixture
- Test dimmer compatibility: Not all LEDs work with all dimmers
- Check for voltage fluctuations: Other appliances may be affecting power
Discolored Trim
- Clean with mild soap: Remove grease and cooking residue
- Check for heat damage: Ensure proper IC-rating if insulation is present
- Consider replacement: Some trims naturally discolor over time
Uneven Brightness
- Check for mixed brands/models: Replace with matching fixtures
- Inspect for water damage: Look for signs of moisture in the housing
- Test voltage: Ensure consistent power to all fixtures
Most issues with can lights in kitchen installations can be resolved with these simple troubleshooting steps, but don’t hesitate to call a professional electrician for persistent problems.
Environmental Considerations and Sustainability 🌿
Modern can lights in kitchen designs have made significant strides in environmental friendliness, but there are still important factors to consider:
Energy Efficiency Beyond LED
While LEDs have dramatically reduced energy consumption, consider these additional steps:
✅ ENERGY STAR Certification: Look for this label on all fixtures ✅ Smart Controls: Occupancy sensors and timers further reduce energy use ✅ Natural Light Integration: Position can lights to supplement rather than replace daylight ✅ Sealed Fixtures: Prevent conditioned air from escaping through recessed light openings
I recently installed can lights in kitchen spaces for a client focused on sustainability, and we incorporated daylight sensors that automatically adjust brightness based on natural light levels, reducing energy consumption by an additional 30%.
Responsible Disposal
When removing old can lights, dispose of components properly:
- Recycle metal housing: Most scrap metal facilities accept these
- Properly dispose of LEDs: Many municipalities have specific LED recycling programs
- Handle mercury with care: If disposing of older CFL bulbs, follow local hazardous waste guidelines
Responsible disposal ensures that your kitchen lighting upgrade doesn’t negatively impact the environment.
Frequently Asked Questions About Can Lights in Kitchen Installations 🤔
Over the years, I’ve fielded countless questions about can lights in kitchen projects. Here are answers to the most common queries:
How many can lights do I need for my kitchen?
The general rule is one recessed light for every 4-6 square feet of ceiling space. For example, a 12×12 foot kitchen (144 square feet) would need 24-36 can lights. However, this is just a starting point—factors like ceiling height, light output, and other light sources will affect the final number.
Can I install can lights in a kitchen with a concrete ceiling?
Yes, but it requires specialized equipment and expertise. Shallow-depth LED puck lights or surface-mounted fixtures designed to look like recessed lights are often better alternatives for concrete ceilings. These provide the aesthetic of can lights in kitchen spaces without requiring deep ceiling penetration.
Do kitchen can lights need to be IC-rated?
If your can lights will be in contact with insulation in the ceiling, then yes, they absolutely must be IC-rated (Insulation Contact). Non-IC rated fixtures can create fire hazards when in contact with insulation. When installing can lights in kitchen ceilings, always check what’s above the ceiling to determine if IC-rating is necessary.
How do I clean grease off my kitchen can light trims?
Kitchen grease can accumulate on light fixtures over time. For safe cleaning:
- Turn off power to the lights
- Remove the trim according to manufacturer instructions
- Soak in warm, soapy water
- Scrub gently with a soft brush
- Rinse and dry completely before reinstalling
Regular cleaning prevents permanent discoloration of your can lights in kitchen trims.
Can I replace just the bulbs in my existing can lights?
In most cases, yes. Many older can light housings can be retrofitted with LED modules that replace the original bulb and trim. These retrofit kits are an excellent way to upgrade can lights in kitchen fixtures without replacing the entire housing.
Conclusion: Lighting the Way to Your Dream Kitchen 🌟
Installing can lights in kitchen spaces is one of the most impactful upgrades you can make to your home. The right lighting transforms not just the appearance of your kitchen but also its functionality and how you experience the space.
We’ve covered everything from basic planning and selection to installation and smart integration. Remember these key takeaways:
✅ Strategic Placement: Position lights based on work areas and activities ✅ Quality Matters: Invest in durable, energy-efficient fixtures ✅ Professional Installation: Consider hiring an electrician for complex situations ✅ Smart Integration: Explore the benefits of connected lighting systems ✅ Proper Maintenance: Regular care ensures optimal performance and longevity
Whether you’re building a new home, renovating your existing kitchen, or simply updating your lighting, thoughtfully designed can lights in kitchen areas will enhance your cooking experience and add value to your home.
Ready to experience the transformation that proper lighting can bring to your kitchen? The products recommended throughout this guide represent the best options currently available. Click through to explore specifications and see which fixtures are perfect for your unique space!
More FQAs:
❓ How far apart should recessed lights be placed in a kitchen?
✅ Recessed lights should typically be spaced 3 to 4 feet apart to ensure even illumination without creating shadows...
❓ Do I need to install under-cabinet lighting along with recessed ceiling lights?
✅ Yes, under-cabinet lighting helps eliminate shadows on countertops and enhances task lighting, complementing overhead recessed lights...
❓ Can recessed lighting be installed in any type of ceiling?
✅ Recessed lighting is suitable for most ceilings, but avoid installing them in concrete ceilings or those with detailed plasterwork or molding...
❓ Should recessed lights be placed near the edges of the ceiling?
✅ It's recommended to place recessed lights about 3 feet away from walls to prevent shadows that can make ceilings appear lower...
❓ Is it necessary to use dimmer switches with recessed kitchen lighting?
✅ Using dimmer switches allows you to adjust the brightness of recessed lights, providing flexibility for different tasks and creating the desired ambiance...
Recommended for You:
- Bronze Kitchen Faucets 2025: Stunning Designs That Will Transform Your Kitchen Instantly
- Unlock Timeless Elegance: 10 Stunning Brass Kitchen Faucets That Transform Your Space Instantly
- The Ultimate Guide to RV Kitchen Faucets: Top Picks for Your Mobile Home in 2025
Disclaimer: This article contains affiliate links. If you purchase products through these links, we may earn a small commission at no additional cost to you.


